Welcome to Julia Bloom’s Blog
Here I describe my past work and career experiences, and give tips on how you can be both flexible and creative at work. I also post about my progress in learning new AV skills, and summaries of events in the AV and Immersive Design fields.

School of Motion Class Review
4/12/25

Last month I completed an online class with School of Motion: After Effects Kickstart. I decided to take it on a whim, since January/February is the slow season in the Event Production industry, and I had wanted to get into Motion Design for a while. The four week class was definitely challenging, but I still learned a lot in a very short time. While I know I still need plenty of practice to grow my skills, I’m proud to share some of my favorite class projects.
10 Second Countdown
This countdown video for social media was my final project, and I needed to have every element move continuously and use match cuts between each shot. Most class assignments had Easy, Medium, and Hard difficulty compositions we could choose between depending on our skill level and how much time we had to work on it before the deadline. I chose the hardest level composition for my final, as I wanted an additional challenge that would show off all the skills I’d learned so far.
Lamps Love
This project was one of three logo design options to create a five second animation. I initially picked the “Mugs and Kisses” option, but after I finished my choice, I decided to go back and try to animate another logo, “Lamps Love.” I changed the background color from black to yellow to make the “lights on” animation, and added simple movements to the rest of the elements.
Week in Review
Our course teacher, Nol Honig, really likes animating collages of images, and this exercise involved animating collages of the days of the week. Not only did I need to animate each piece of the collage sliding offscreen, I also had to change the speed of these transitions to create match cuts, seamless transitions between shots using matching animations. I also added a few small touches to some of the collage parts, like getting the dancing couple image in one shot to “dance” onscreen.
No Copilot
This assignment required animating onscreen lyrics in sync to a music track, which was much harder than it seemed. Even when I used the Easy project it was hard to get the timings right, and scrubbing the audio track to find the “start” and “end” of syllables was quite a pain. On top of that, I had to make sure all the other elements in the composition moved separately and continuously in each frame. While I tried my best with my class submission, I wanted to go back and try to complete the full animation with the full length song. After importing the Easy shots I’d already completed to the Hard version, I synced the remaining lyrics to the rest of the song and animated as many of the background shapes and lines as I could. I’m much happier with the new results, and redoing the project has inspired me to create my own lyric animation video in the future.
Thinking about the future, I’m considering taking another School of Motion class in the Summer or Fall. I’m interested in Cinema 4D Basecamp to improve my 3D skills, and MoGrt Mania so I can create Motion Design Templates that I can sell online. Whatever opportunities come my way next, I’m glad I chose to jump into Motion Design.
Sources:
https://www.linkedin.com/in/nol-honig-710266/
My Goals for 2025
1/21/25
Happy New Year! I hope you all had restful and fun holidays. I’m not usually in the habit of making New Year’s Resolutions, but this year my goal is to create a motion design and animation demo reel. To achieve this I’ll need to get more experience in motion design, digital modeling, and animation to create content I can showcase on my site. I recently started the “After Effects Kickstart” class at School of Motion, an online program that teaches animation, and digital design skills. I also purchased a new Macbook Pro that works better with animation programs as a holiday gift to myself. In addition to After Effects, I’m also practicing 3D modelling in Blender, with the help of the workbook “Blender by Example” by Oscar Baechler and Xury Greer. I will post my completed AE and Blender projects on the website throughout 2025, so look forward to it!
The last chapter of “Designing Immersive 3D Experiences” provided some additional goals for building my skills in XR. One of them is to try out different XR applications and devices, and I got to experience one at the Apple store when I bought my new Macbook. While I was waiting for the data transfer to my new computer to complete, a salesperson asked if I would like to try the Apple Vision Pro, a spatial computing XR headset. I agreed, and soon was strapping on the device and going through setup. The headset used a mixed reality “pinch” gesture for set up and navigation, where pinching a program icon between two fingers would open it. The main screen looked like a 360 degree computer desktop, with icons for different programs displayed in an immersive space. You could customize the spatial computing desktop with 360 degree “wallpapers.” I enjoyed these, as it was relaxing to be surrounded by a forest or beach scene with the computer apps only in front of me. The Vision Pro could also switch to VR mode, and show movies and programs from the Apple Immersive catalog. I watched the AI demo video, but while the visuals were impressive, they were in a 180 degree view rather than 360, like a curved IMAX screen.
(Image courtesy of Apple.com)
My experience with the Vision Pro showed me some benefits of the system, but also several downsides. I don’t think its pinch navigation mechanic is very intuitive for first time users, as most other device interactions require clicking to open applications. The headset was also pretty heavy, and pushed down on cheeks and bridge of my nose even when fully secured. The salesperson also needed to add lenses that matched my glasses prescription to the device before I used it. While I’m unsure if these would require an additional charge, I can tell that they could be a pain to replace if the owner lost or broke them. Overall, the free trial was interesting and informative, and I’ll continue to try out immersive and virtual experiences and devices throughout the year.
Sources:
“Apple Announces more than 600 New Apps Built for Apple Vision Pro.” Apple Newsroom, February 1st, 2024. https://www.apple.com/newsroom/2024/02/apple-announces-more-than-600-new-apps-built-for-apple-vision-pro/
“Introducing Apple Vision Pro.” YouTube, uploaded by Apple, June 5th, 2023, https://www.youtube.com/watch?v=TX9qSaGXFyg
Stevens, Renee. Designing Immersive 3D Experiences. Pearson Education Inc., 2022, pp 359-377.
Practicing Immersive Design-Part 12
12/02/24
The final exercise in “Designing Immersive 3D Experiences” is to take everything I’ve learned so far and use it in a design sprint.
I would:
Choose an idea for an AR interaction
Sketch the design on a clear plastic sheet,
Determine how users can interact with the element and how to make it clear it is interactable
Design for the location the app will be used in
Create 3D and 2D content for the app
Export content to a software program like Adobe Aero
Add a behavior with a trigger and action
Launch the program to see if it works
Test and revise the interaction
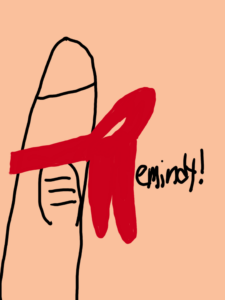
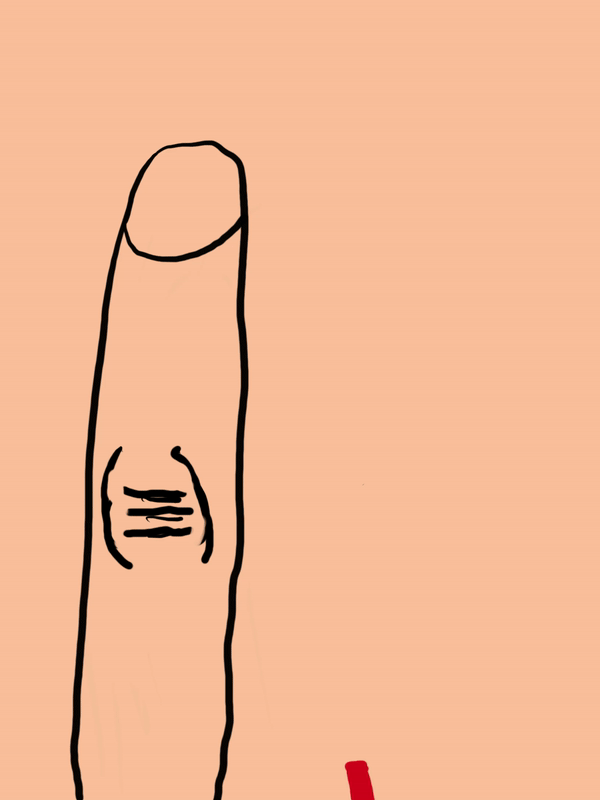
My idea is a prototype app called “Remindy” which would allow users to take a photo of a reminder or event poster and have the information automatically copied to their mobile calendar.
After designing and planning for the app, I needed to figure out what software I’d need to design my interaction in. After some research, I designed my prototype in Figma, a browser based program for designing and testing apps, websites, and other online projects. I even animated its logo, which will play whenever a user opens the app.
My original plan was to use OCR (Optical Character Recognition) software to enable text recognition on images. Currently I have not been able to get this plugin to work, so my current prototype uses an example image to show all the options available after Remindy scans image text. Reminders can be saved in notes or calendar apps, or sent as an email. There’s also an option to include the original image with the saved text, and I may add an option to embed any QR codes in the image within saved reminders later. Feel free to check out Remindy’s prototype below, and leave suggestions for how to improve it in the comments.
Since I’ve finished all the exercises in “Designing Immersive 3D Experiences,” I was wondering what I should tackle next. Are there any other tutorials for 3D design or computer-based animation that could help me grow my skills? One possible option is Hyper-Reality by Curtis Hickman, the creator of The Void, which produces Mixed Reality games in purpose built locations. For now, though, I’m going to take a well earned holiday break. I’ll see you in 2025!
Sources:
Hickman, Curtis. “The Void.” mysite, curtishickman.com/the-void, Accessed December 2nd, 2024.
Stevens, Renee. Designing Immersive 3D Experiences. Pearson Education Inc., 2022, pp 325-358.
Practicing Immersive Design-Part 11
07/22/24
Chapter 12 of “Designing Immersive 3D Experiences” focuses on audio for XR, and starts with a listening exercise. I needed to close my eyes for five minutes and listen to all the sounds around me, then draw a chart showing what sounds I heard and their approximate position in my space. I did the exercise at work during my down time, and drew the chart below.
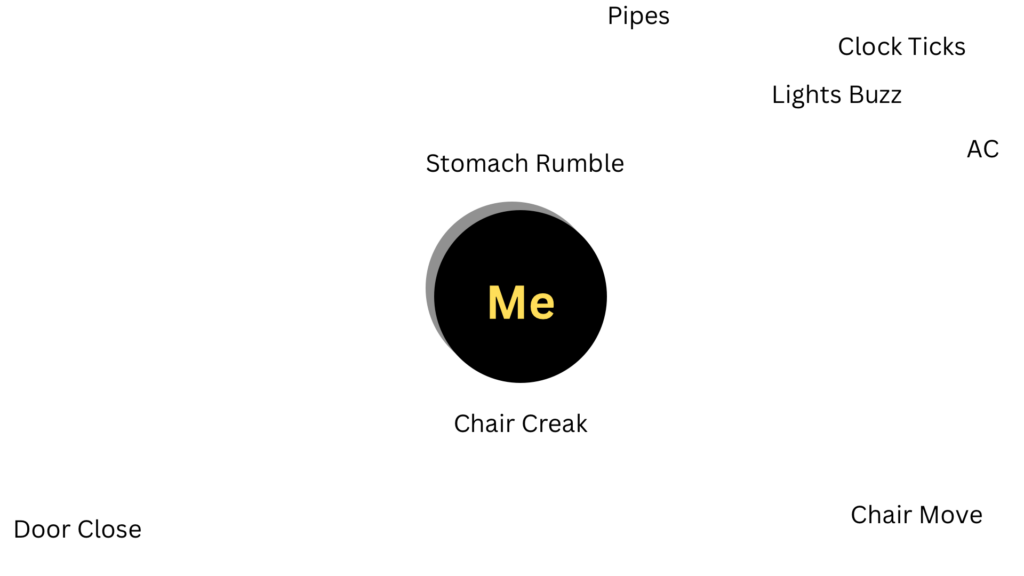
Focusing on the sounds let me pick up on the “background noise” I normally don’t notice, like the air conditioner and hum of the overhead lights, as well as sounds I usually hear, like my chair creaking as I move. This background noise is Ambient Sound, sounds like wind and far away conversations that give a sense of place to where you are. These sounds are used in XR to make the virtual environment or elements feel more “real.” If a beach scene in VR uses the sounds of the waves, wind, and seagulls in the program, the user becomes more immersed in the scene than if no sound was used. If the beach sounds are “placed” around the user, they become Spatial Sound, audio that simulates depth or direction. This way, the user can tell what sound sources are in front of or behind them, and how far away from them sound sources are. The Sony Sound Demo and preshow for the Museum of Science’s Omni theater are good examples of spatial audio. Feedback Sound, or audio sound effects that are synced to certain actions in XR, are another type of audio that help users navigate virtual and mixed reality. A chime can indicate unlocking a treasure chest in a VR game, for example, while a buzzing sound indicates an error or problem in performing a task.
This week’s design challenge is to design my own soundscape for XR, and draw a chart showing what sounds will be used, and where they will be located around the listener.
An extra challenge is to create this soundscape by recording the sounds on the chart, and bringing them into a design program to make my own spatial soundscape. I’m not one to back down from a challenge, so I decided to create an immersive soundscape using WWise audio editing software. Unfortunately this software had a very steep learning curve, and I struggled to move sound files around a virtual space, and then to export the files with my changes intact. After much trial and error, I was finally able to export my edited audio files, and upload my spatial soundscape to YouTube. Feel free to check it out below, and let me know what you think in the comments section. Next time I will tackle the final exercise in the book: creating an AR interaction using the full design project. Look forward to it!
Sources:
“360 Spatial Sound Mapping Demo-Sony.” YouTube, uploaded by Sony Electronics, July 20th, 2021, https://www.youtube.com/watch?v=VGL3x3Cc1io
“Mugar Omni Theater Introduction-Who Put the Bomp?” YouTube, uploaded by 2HHB, February 7th, 2013, https://www.youtube.com/watch?v=MHK2-BVfUzs
Stevens, Renee. Designing Immersive 3D Experiences. Pearson Education Inc., 2022, pp 301-324.
Practicing Immersive Design-Part 10
04/12/24
A few years ago, my local science museum had a temporary gallery allowing visitors to test interactive stations for an upcoming Pixar exhibit. One let guests move different knobs to change the placement and color of light in a model scene, showing how a simple lighting change affects the appearance and mood of a scene in a movie. As chapter 11 of Designing Immersive 3D Experiences focuses on lighting and color in XR, it reminded me of that exhibit concept, and how important lighting is in any media-based project.
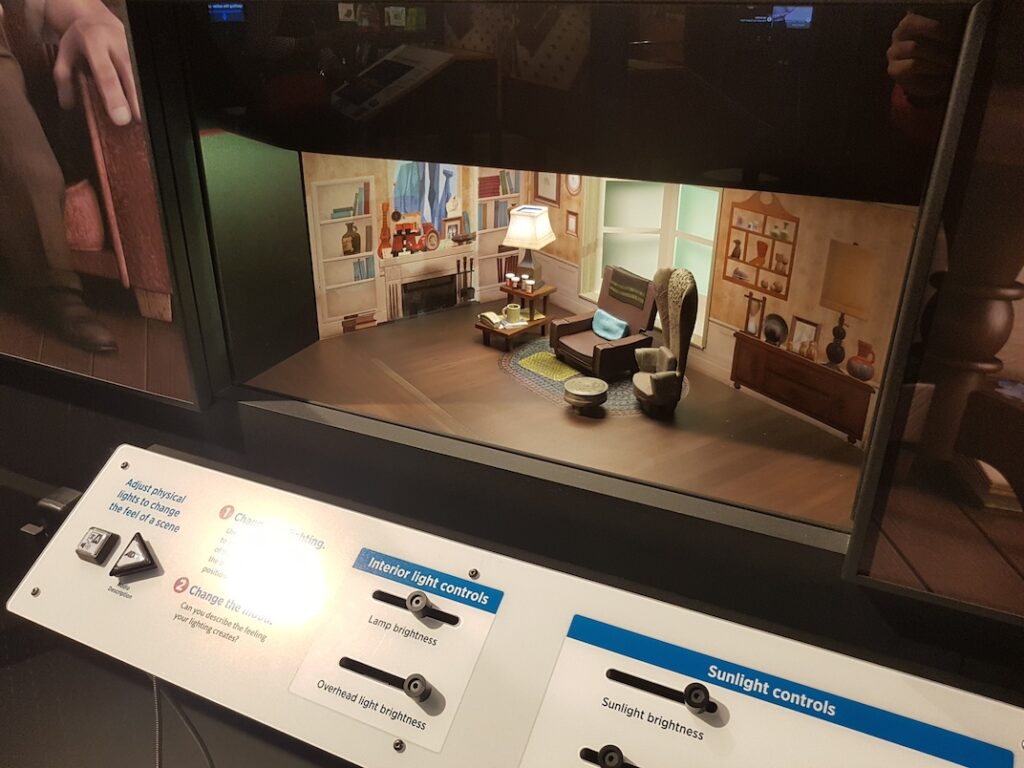 (Kenneth Chan/Daily Hive)
XR experiences must have their lighting programmed in order for the experience to be legible and visually appealing. Applications like Unreal Engine allow users to add various types of lights to a scene, such as spotlights, Ambient light, Point light, Area light, and others. These lights process color in RGB (red, green, blue) format, where different combinations of all three colors combine to form many different shades. Modeling programs also allow control of the placement, intensity, and depth of light and shadows in a scene, and allow users to animate light changes using keyframes. Some AR applications also have sensors and programming that sense how bright or dark the environment around the user is, and use lighting estimation to automatically adjust the brightness or darkness of the application to contrast with it.
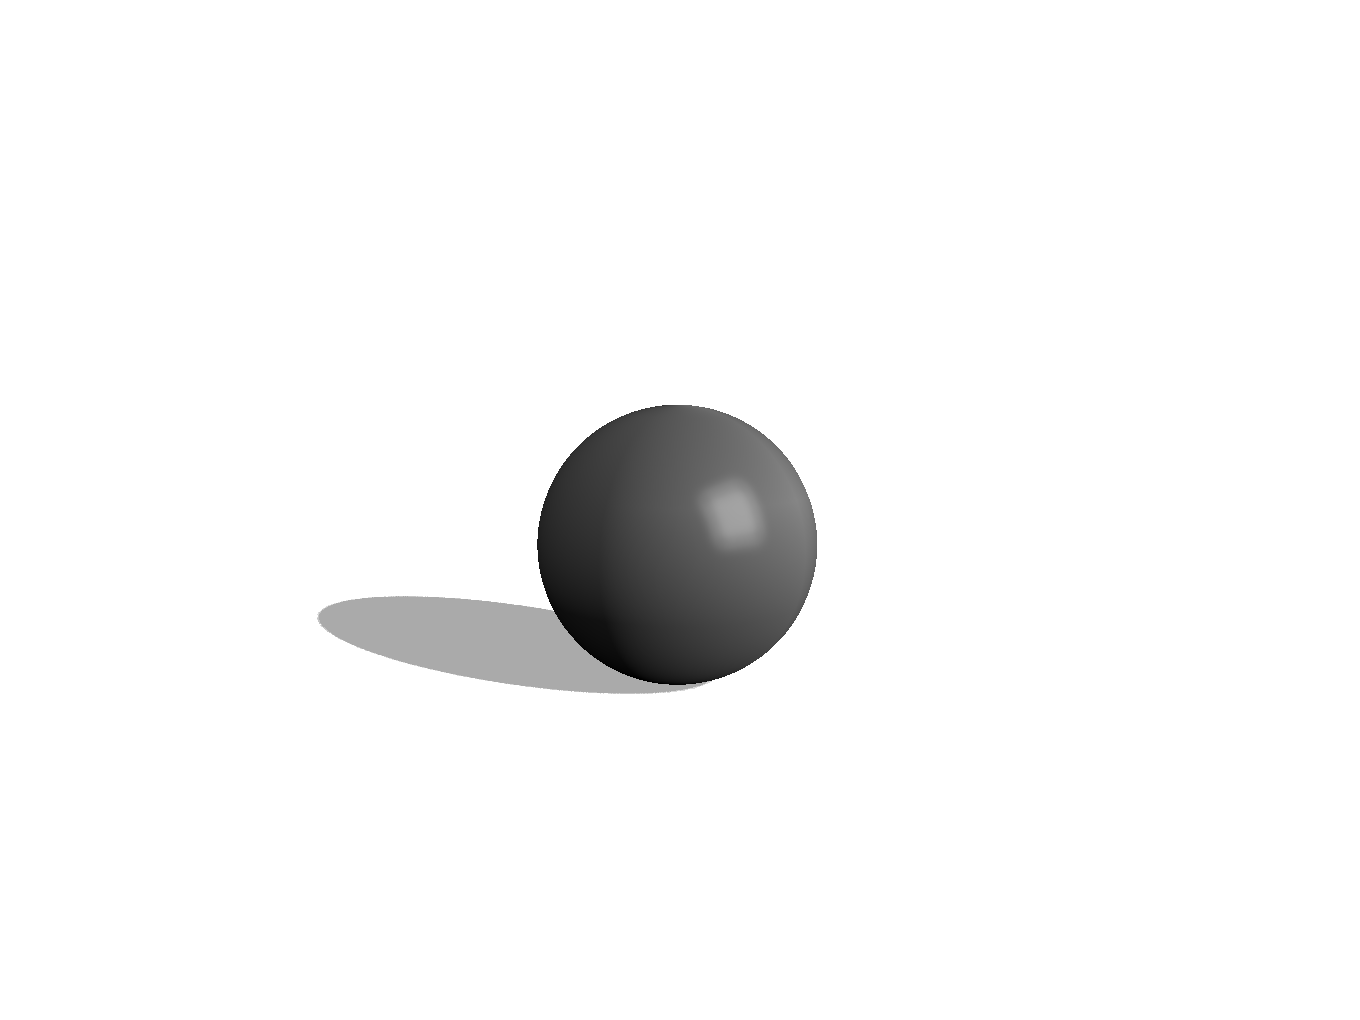
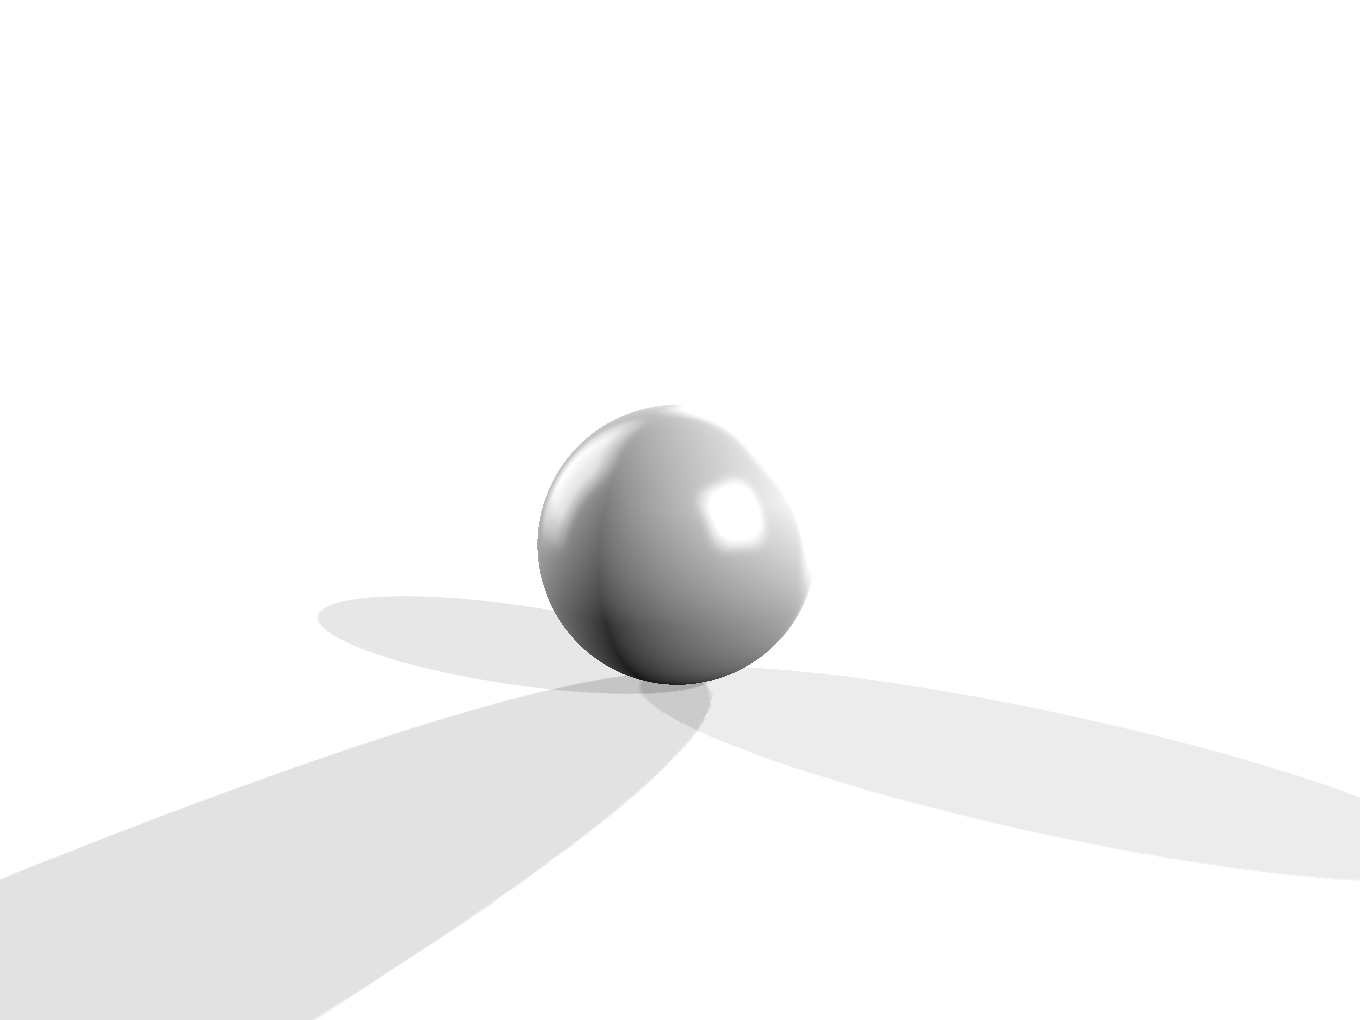
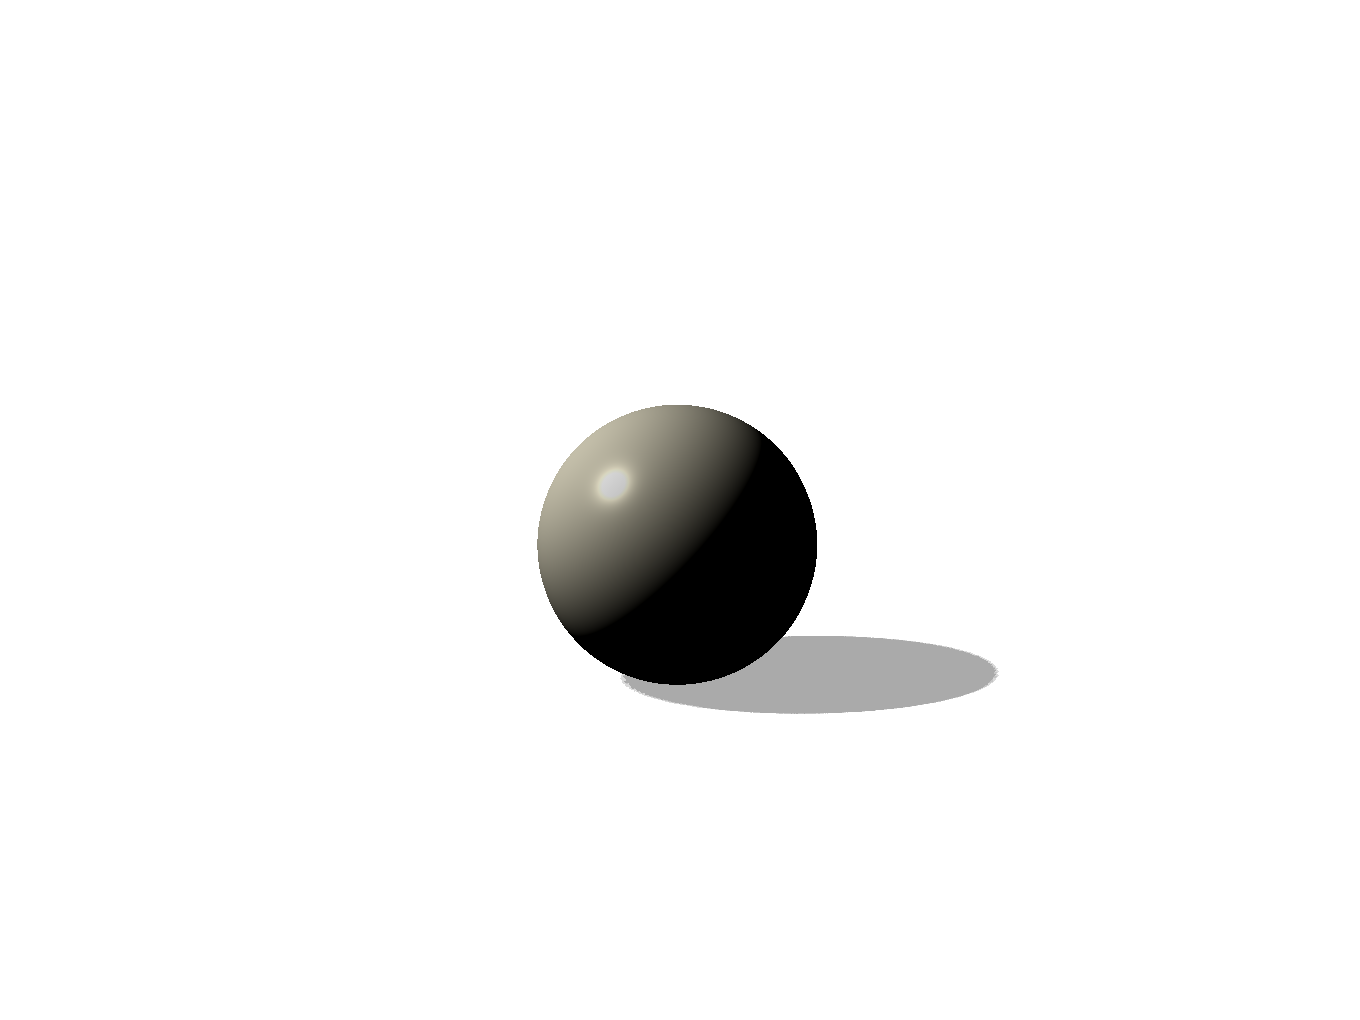
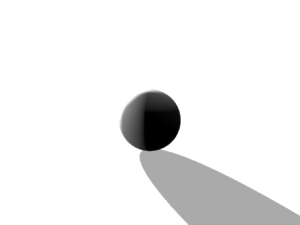
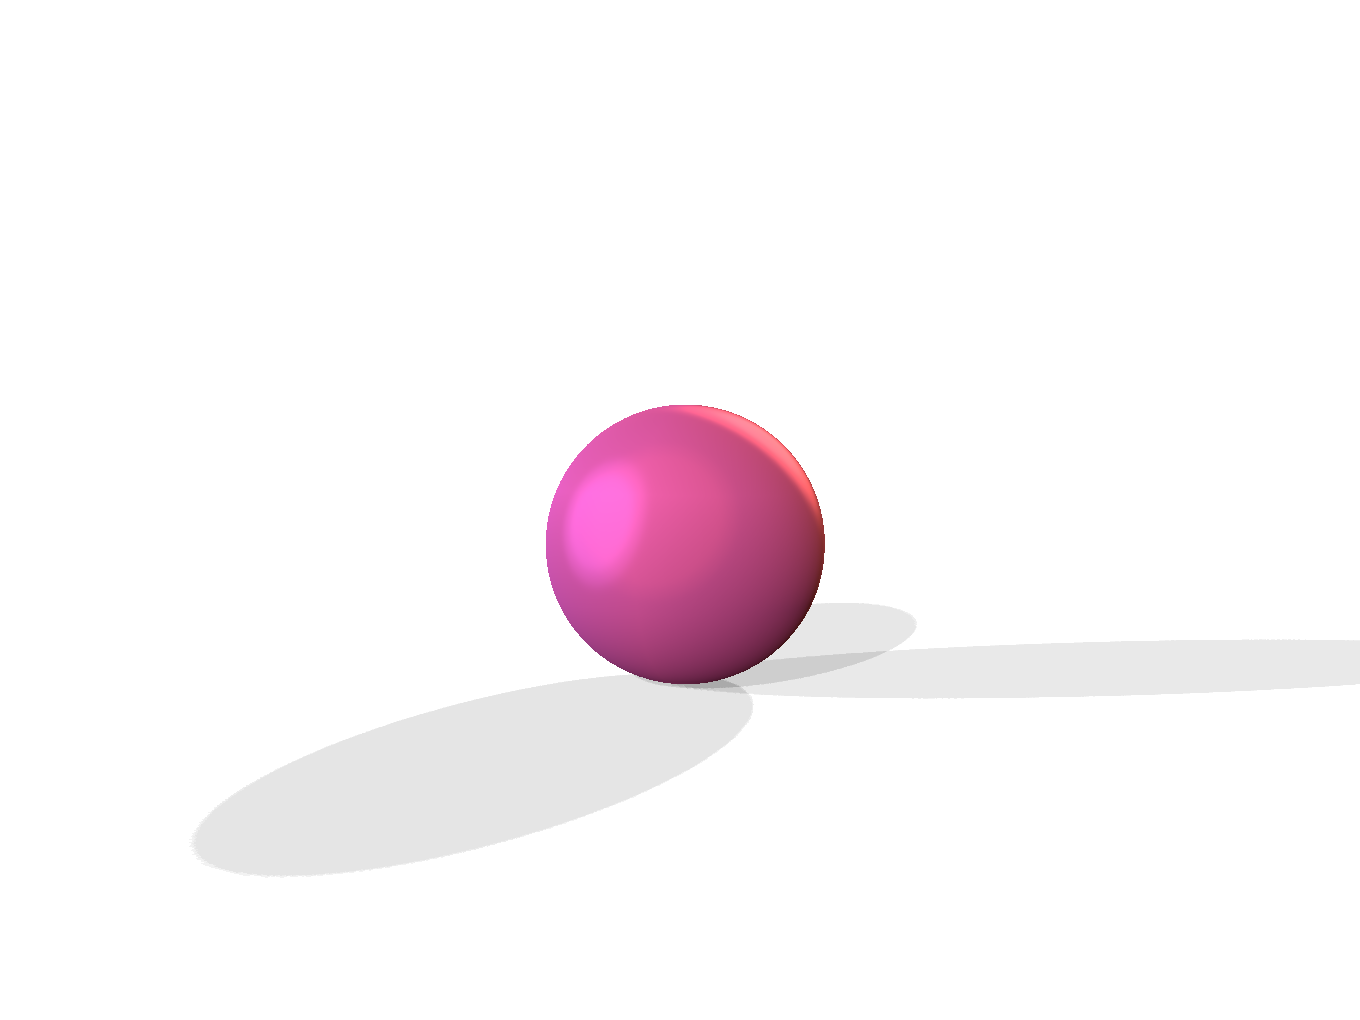
The exercise this time is to create a basic sphere in Adobe Dimension and light it in different ways to see how changes in lighting affect the model’s appearance. My sphere is shown with a point light, three point lighting, sunlight, backlight, and my custom setup of highly diffused pink light. I’ve also been practicing modeling with Unreal Engine 5, and plan to put some simple models and animations up on the website in the near future. Next week I’ll jump into sound design for XR.

Sources:
Chan, Kenneth. “First Look at Disney’s Science Behind Pixar Exhibit at Science World.” Daily Hive, May 19th, 2018, https://dailyhive.com/vancouver/science-behind-pixar-science-world-vancouver-2018-disney
“Lighting.” The Science Behind Pixar, Museum of Science, Boston, https://sciencebehindpixar.org/pipeline/lighting
Stevens, Renee. Designing Immersive 3D Experiences. Pearson Education Inc., 2022, pp 275-300.
Webinar Spotlight-AVIXA Enter the World of Virtual Production
03/13/24
On February 28th I attended the online webinar “Enter the World of Virtual Production” hosted by AVIXA, a professional organization for the Audiovisual industry. I’ve been interested in Virtual Production for a while, as it combines two of my passions, filmmaking and immersive technology, to create virtual sets for TV shows, movies, and other projects. It was moderated by David Maldow-CEO of Let’s Do Video, and had a panel of three Virtual Production experts: Kevin DeLuca-Vice President of Visual Effects at Vu Studios, Addy Ghani-Vice President of Virtual Production at Disguise, and Lyndsae Peele-Founder and Principal Consultant at Kingdom Vision Consulting. These professionals had a lively conversation watched by over 200 attendees, and answered many questions on how to get started in the field.
Virtual Production is only 3-4 years old, but the field has a lack of skilled talent, and the technology it uses is constantly evolving. One presenter called Virtual Production a “wild west” field where you can get started on your own and teach yourself needed skills. Some companies and design software programs even offer free or paid training, such as the Unreal Learning Portal, Unreal Fellowship, Disguise Virtual Accelerator, and the Vu One program. Building virtual assets, like sets and digital art, is handled by Virtual Art Departments (VAD) employed by VP companies, film productions, and TV studios. Shows like The Mandalorian use VP to create the sets the actors perform on, projecting them in real time on LED screens behind the stage. While these assets are often created on paid software like Unreal Engine and Cinema 4D, free programs like Blender and OBSNvidia let students and new users try their hand at virtual design.
The recorded webinar is available to AVIXA members on its website, but it requires a paid membership to access. Membership allows access to all of AVIXA’s recorded webinars, as well If you’re working in the field I highly recommend joining the AVIXA community, which provides access to all of AVIXA’s recorded webinars, training for the Certified Technology Specialist certification, and many other benefits for Audiovisual professionals. Next week I’m back to my series on Renee Stevens’ “Designing Immersive 3D Experiences” with a chapter on lighting for XR. See you then!
Sources:
Brompton Technology. “Virtual Production.” https://www.bromptontech.com/applications/virtual-production
Maldow, David. Enter the World of Virtual Production. AVIXA, February 28th, 2024. Webinar. https://www.avixa.org/avixa-tv/videos/Enter-the-World-of-Virtual-Production/kVhAPYL3-lVef2VIH
Practicing Immersive Design-Part 9
02/23/24
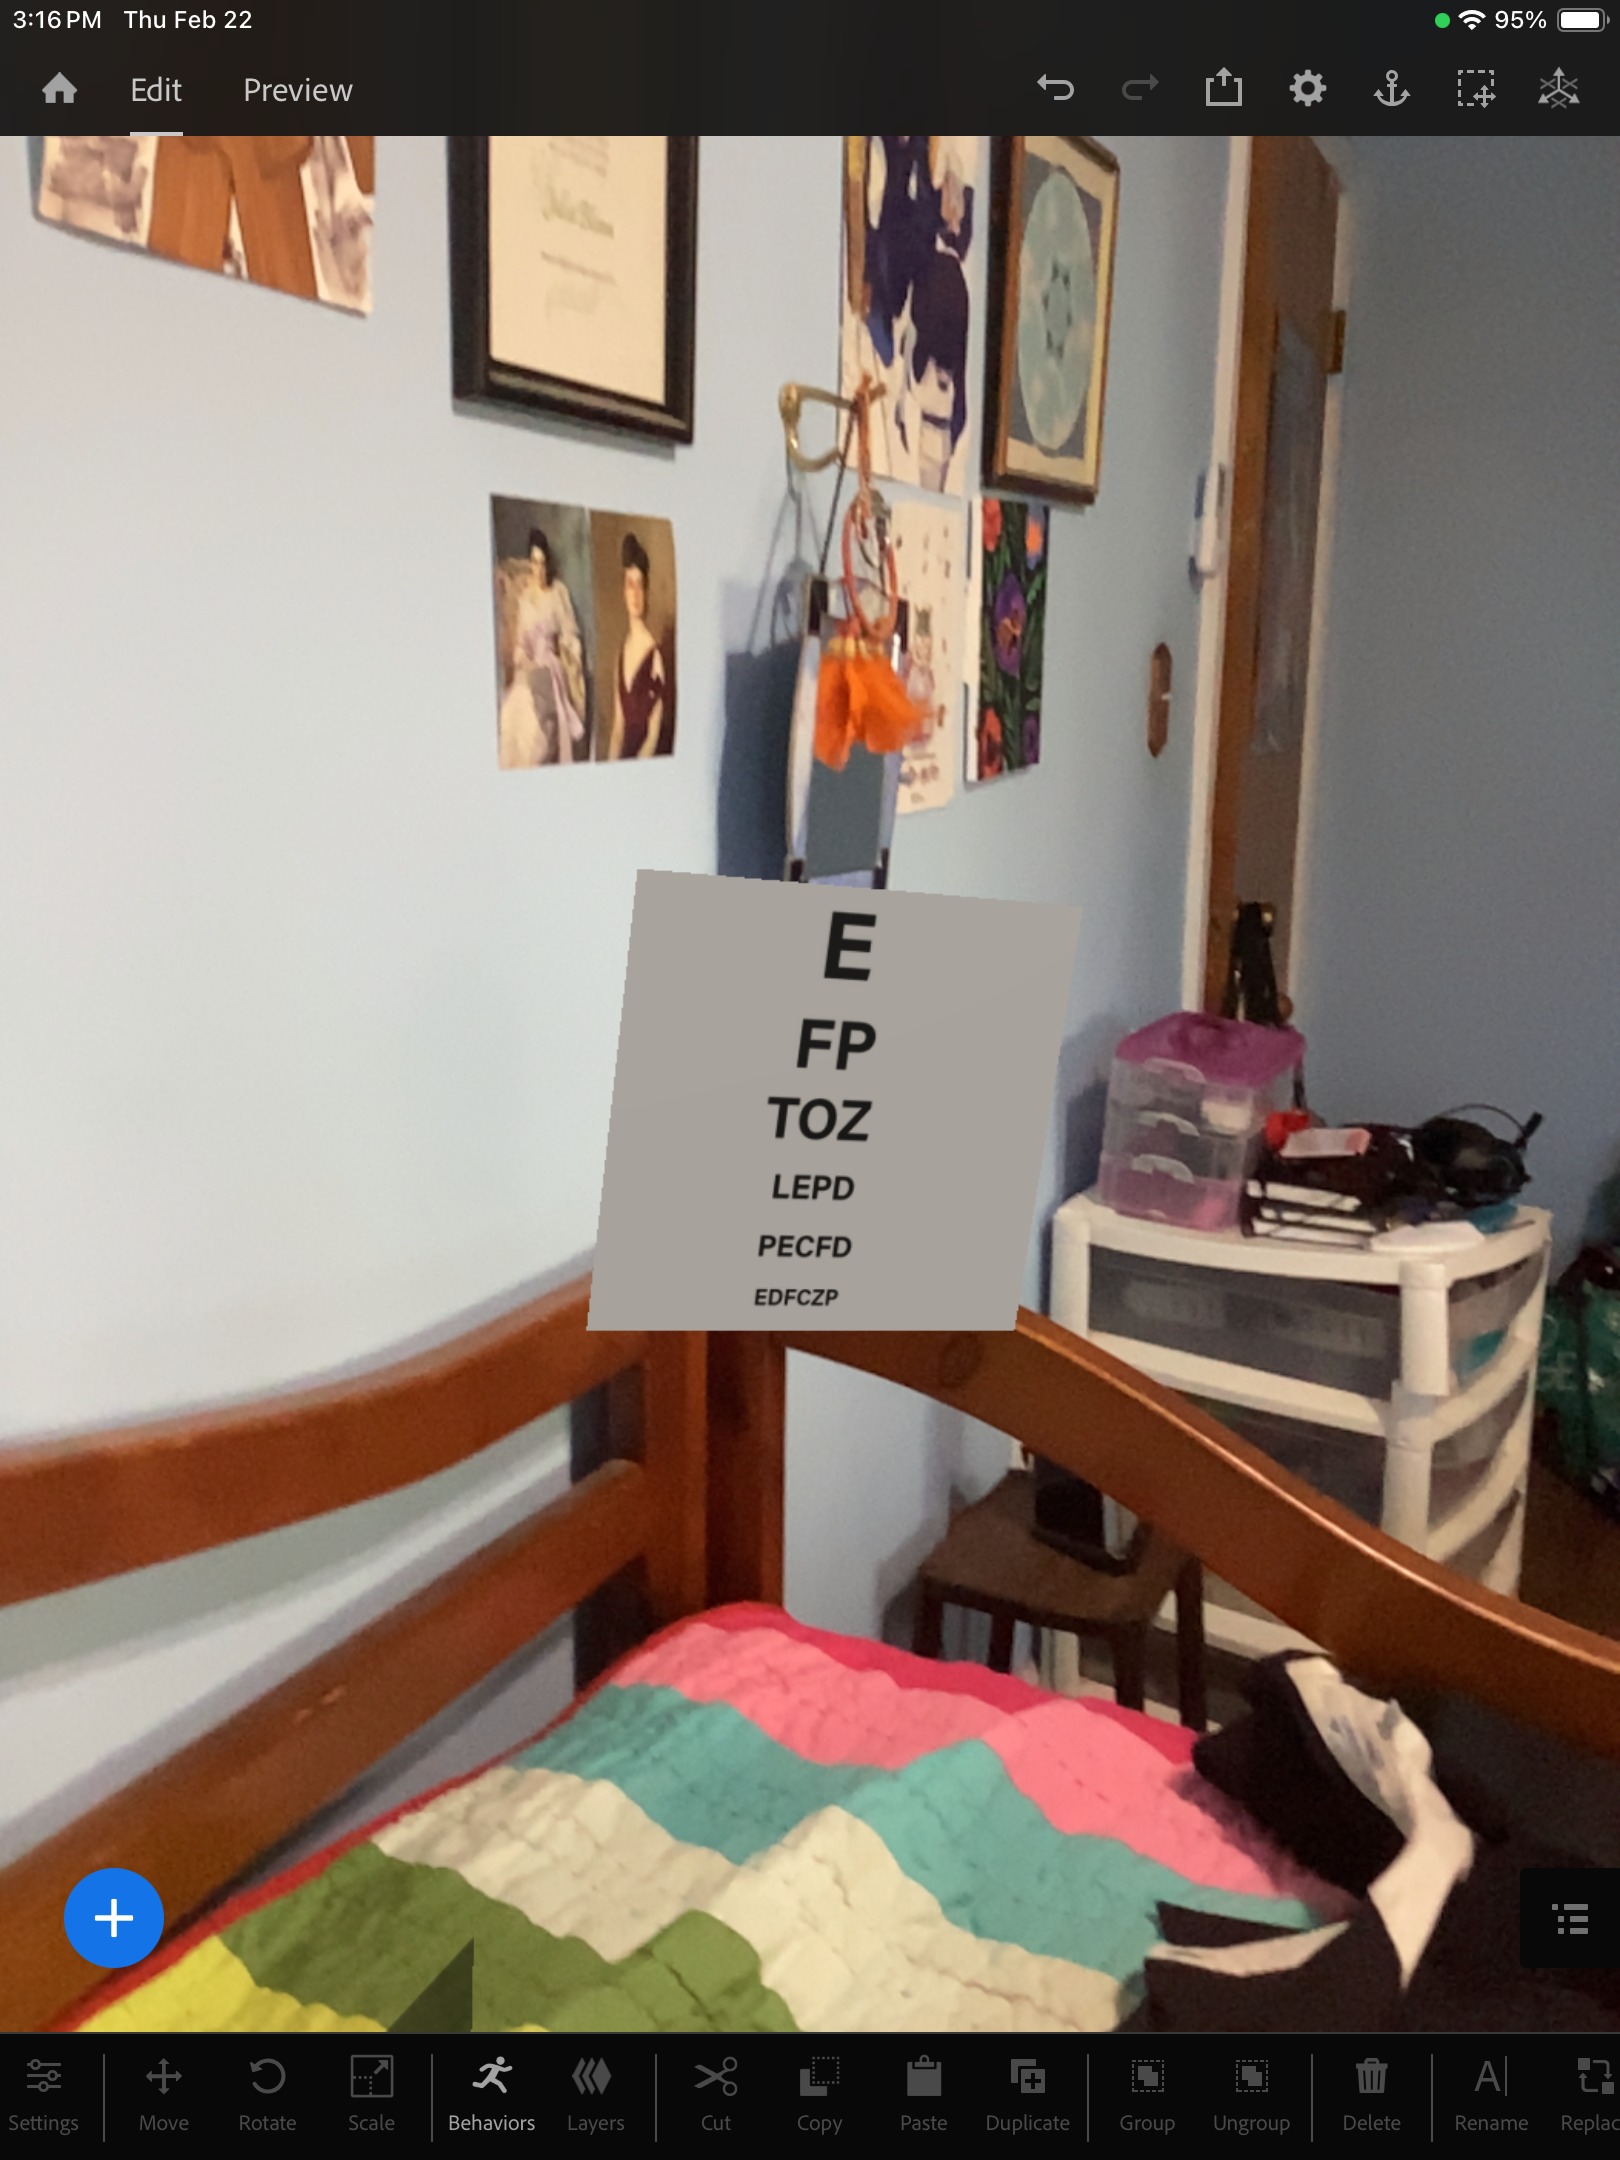
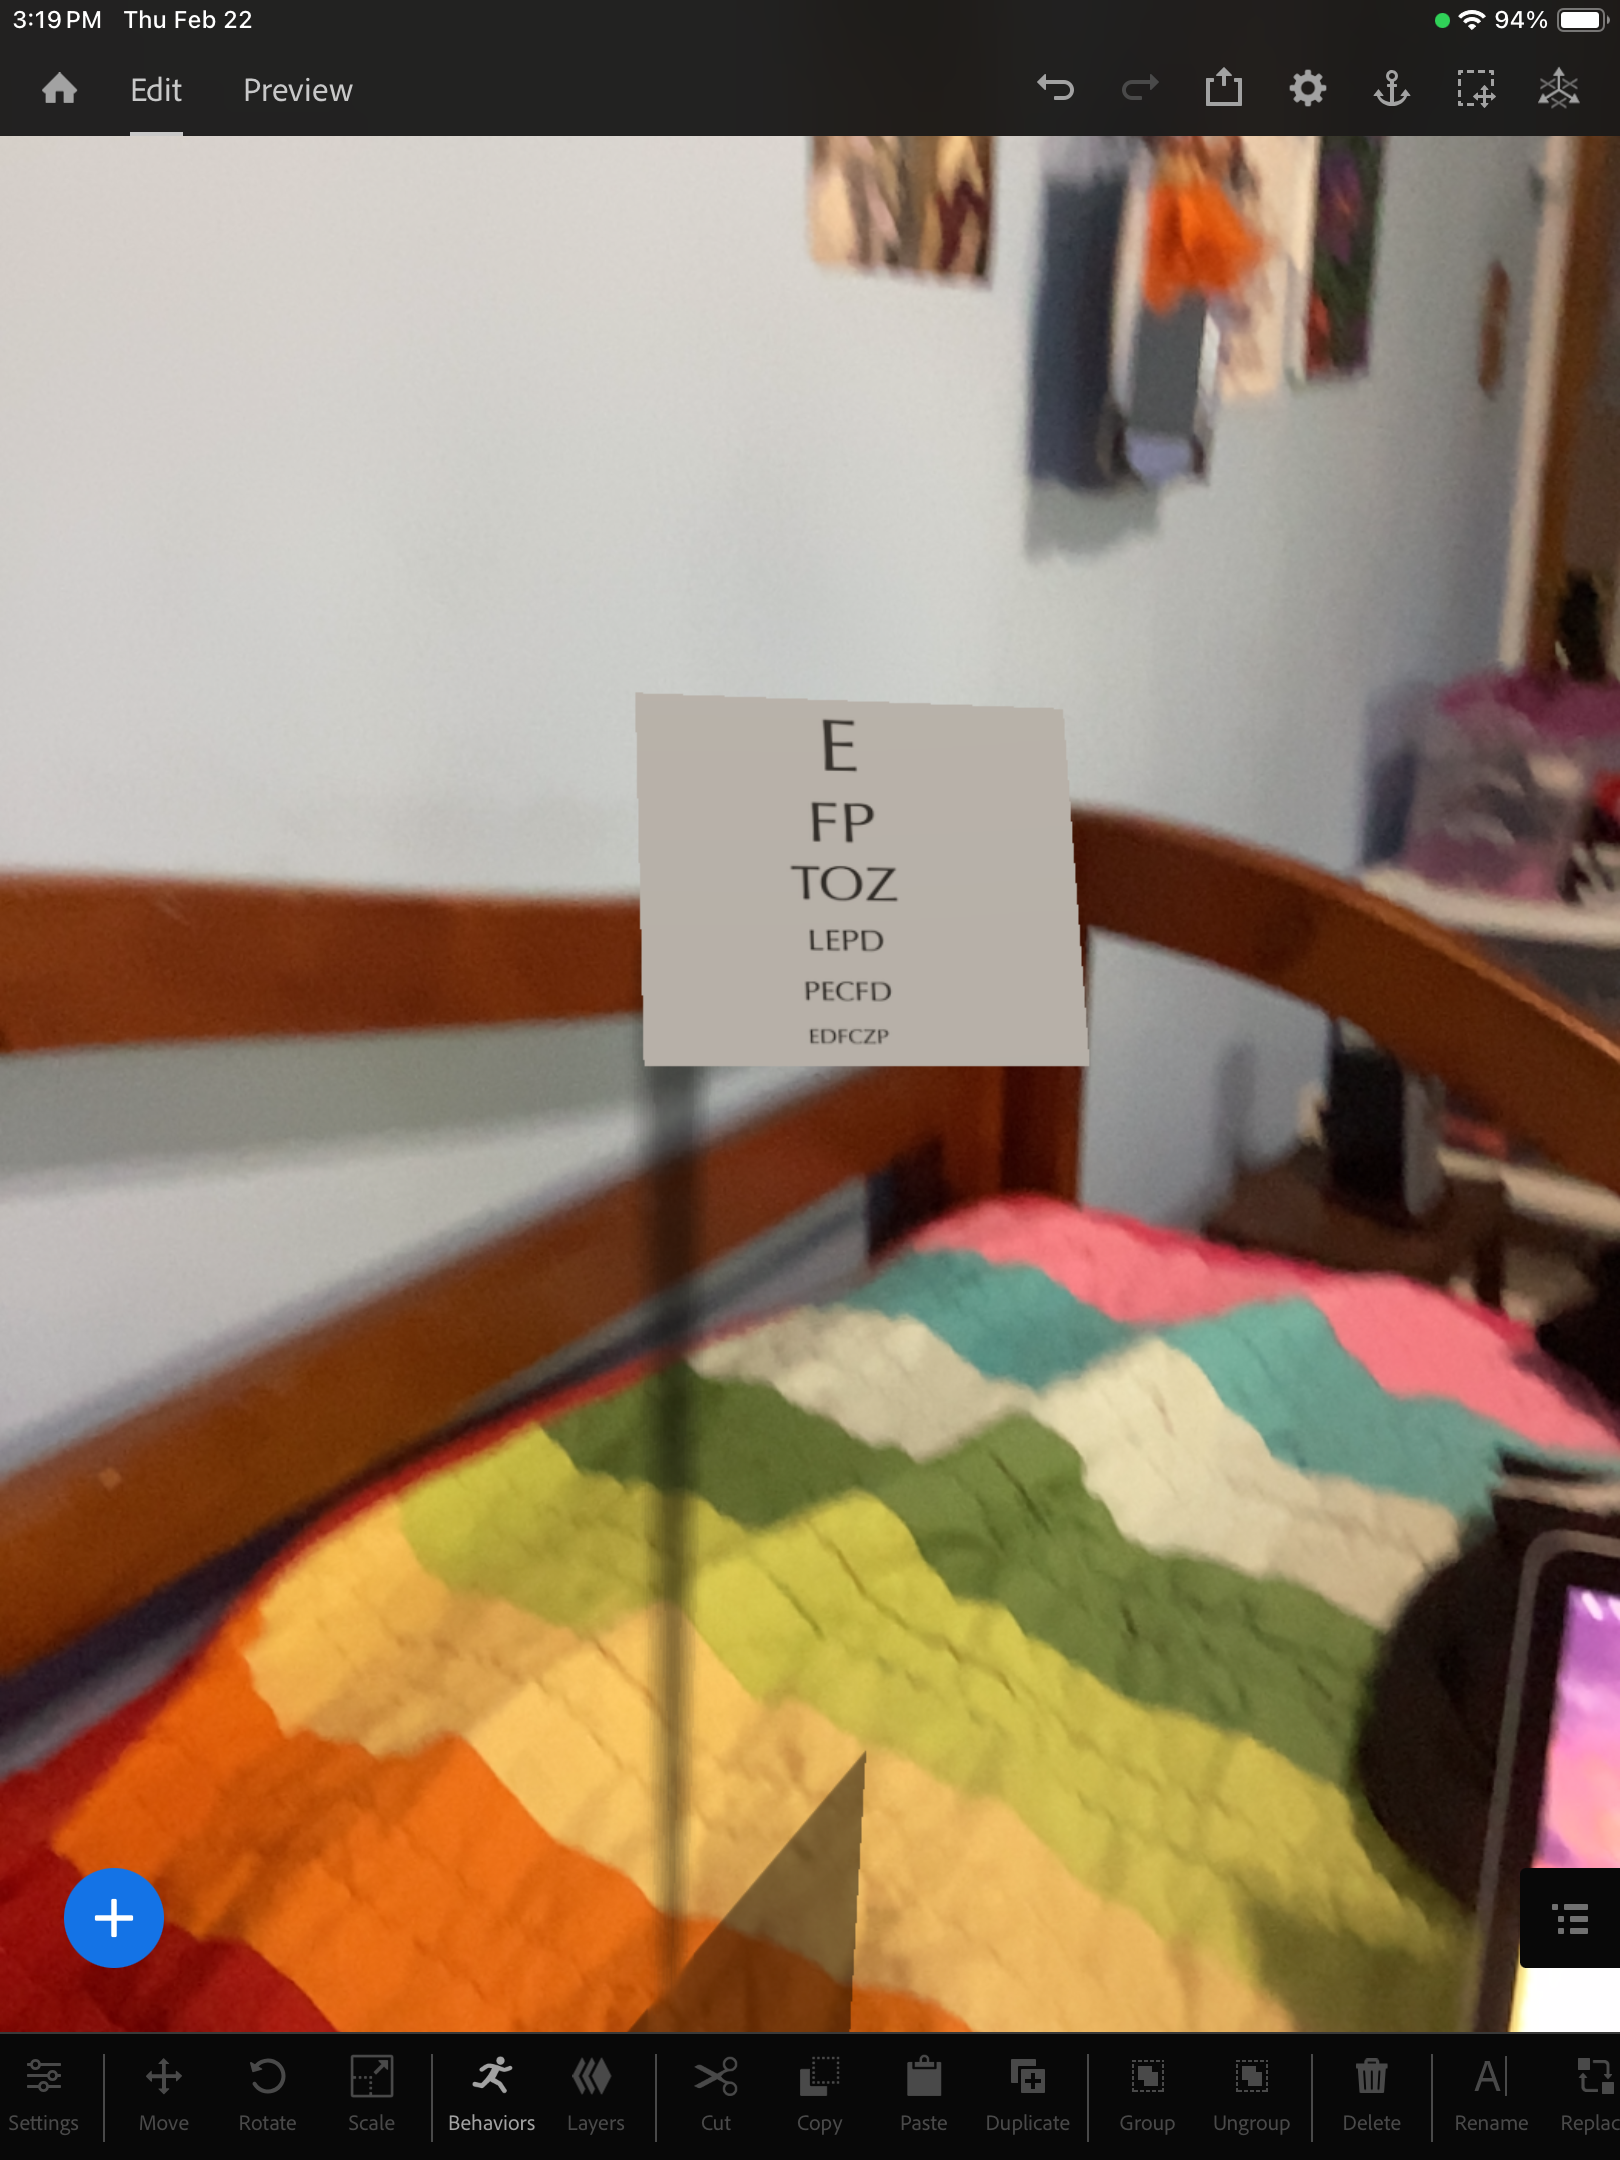
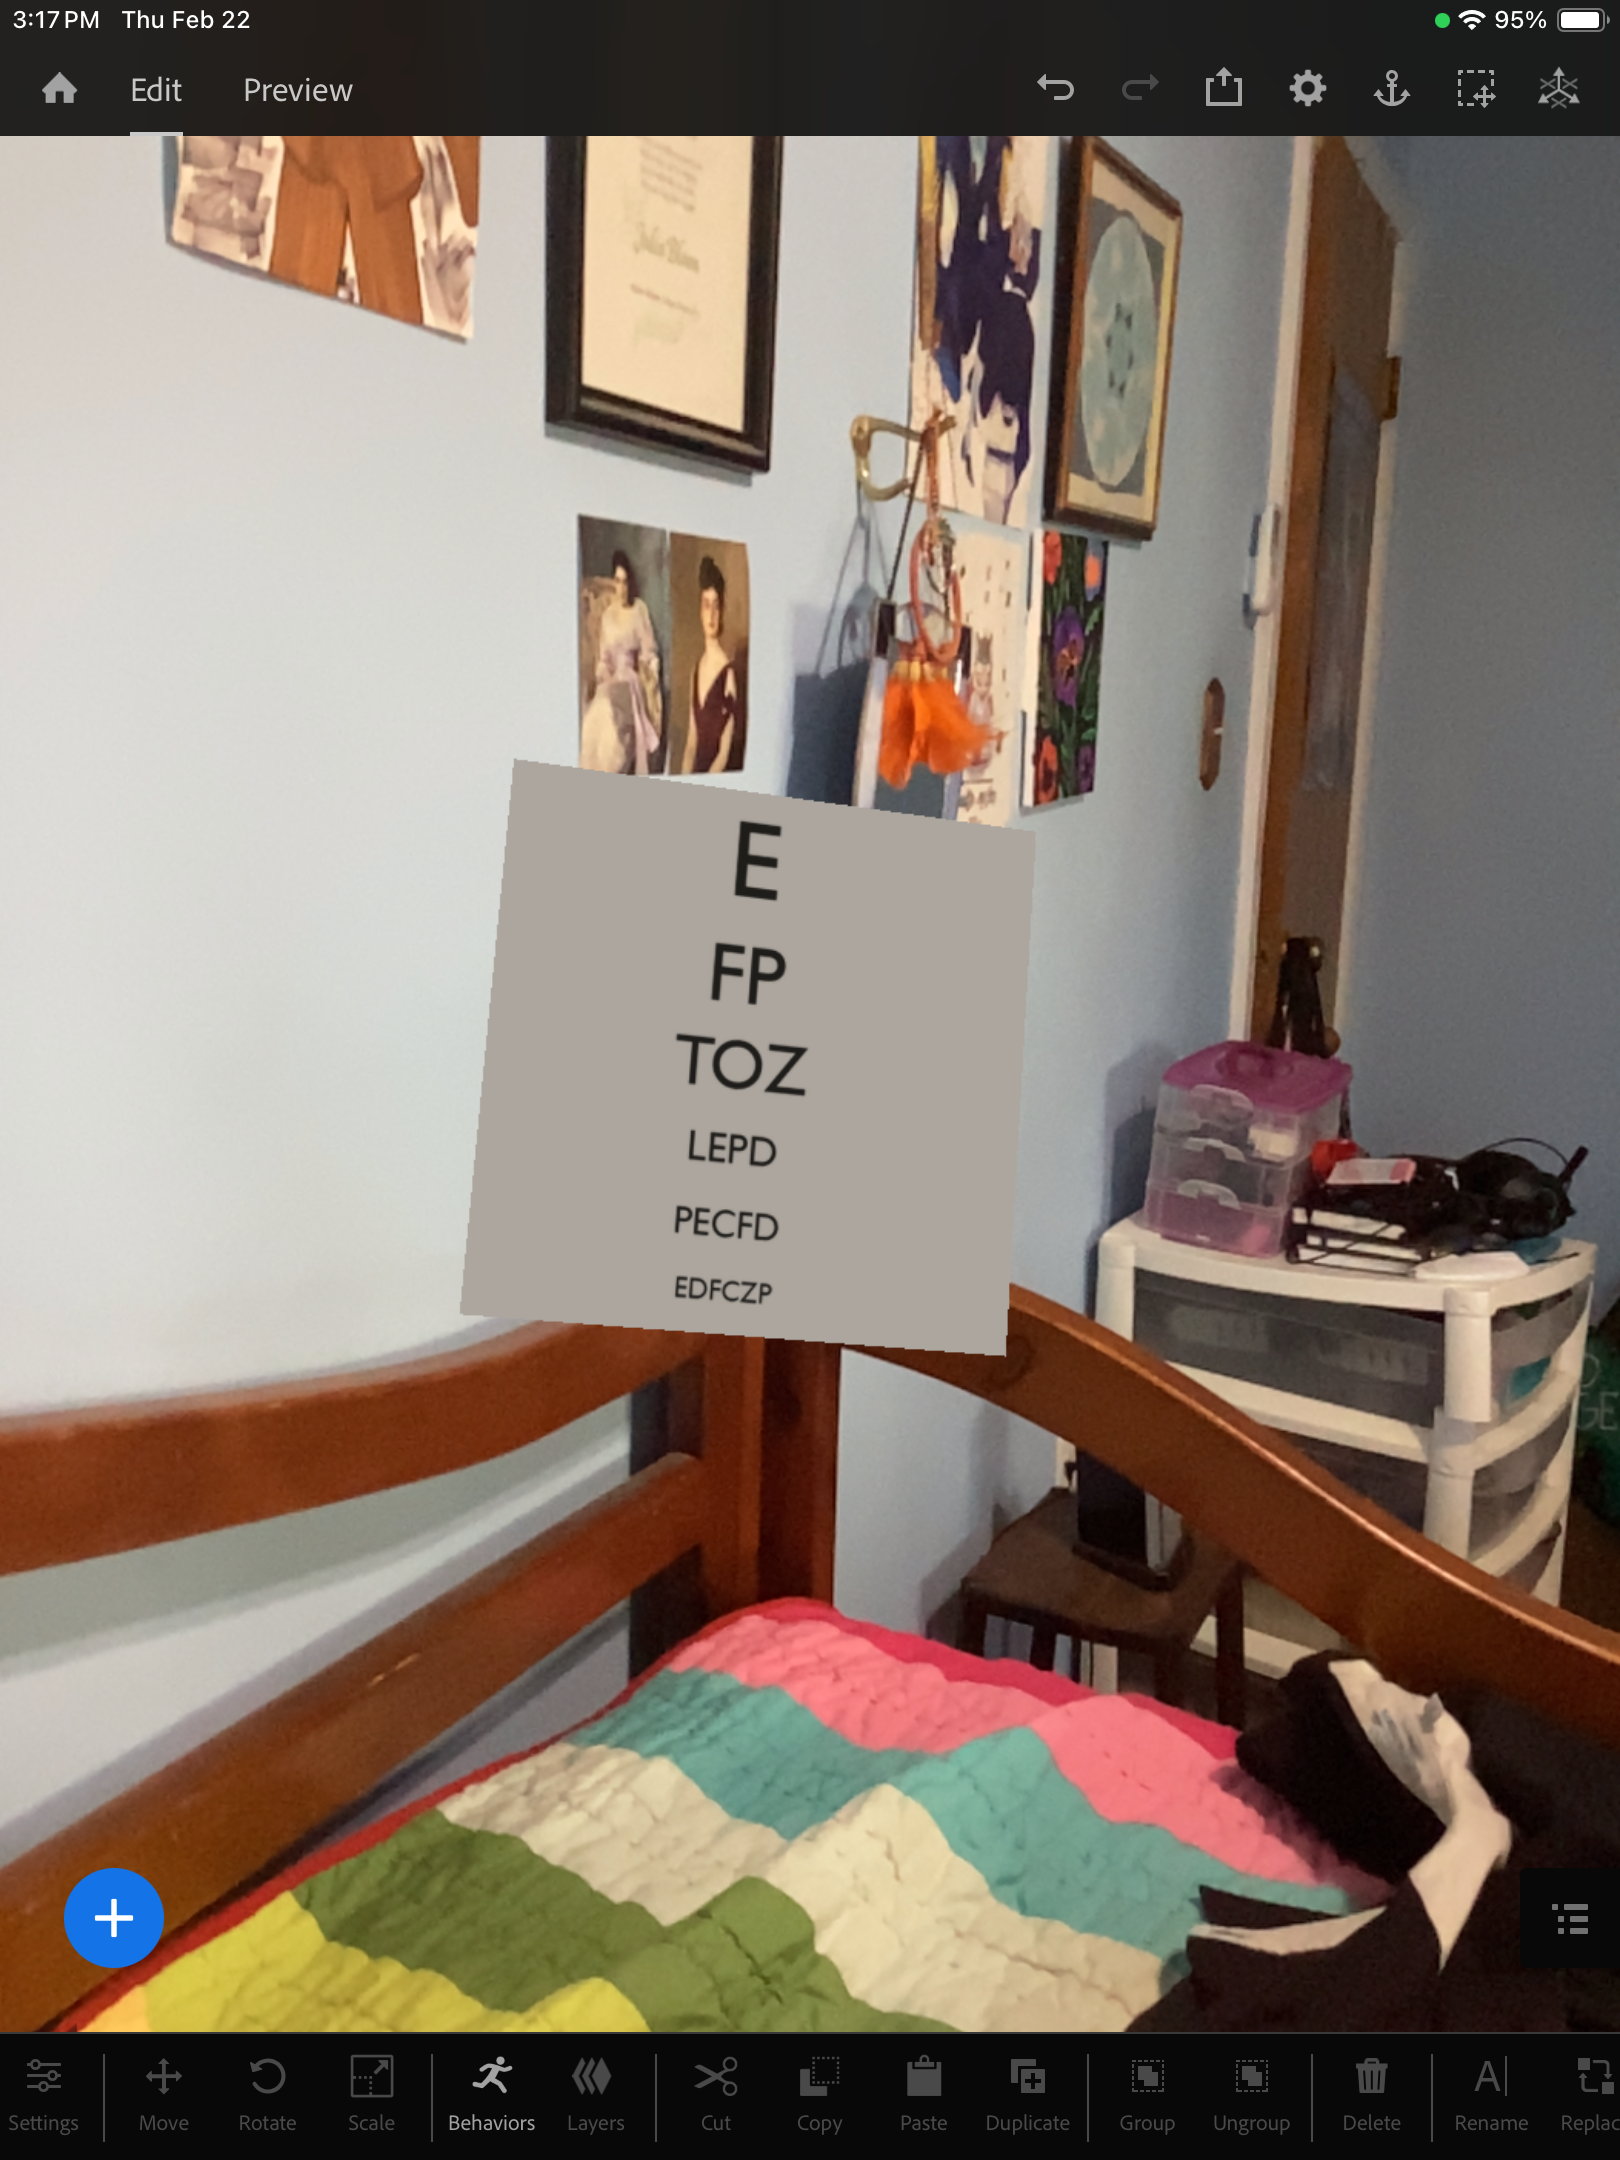
Today’s blog post took longer than I expected to finish, and involved a bit of technical finagling. Chapter 10 focuses on using type and typography in XR, and highlights using contrasting colors, legible fonts, and responsive coding to ensure text is legible and readable no matter what background and lighting is nearby. I’m familiar with these concepts by now, but my main challenge came with the design exercise: Using Adobe Dimension and Adobe Aero to create eye charts in multiple fonts and make them into AR assets. Since it was my first time using either of these programs, I had some trouble manipulating charts and successfully importing them into Aero. After several tries, I carefully reread the instructions for the exercise, and was able to finally see my charts in AR!
The three fonts I chose for my eye chart are Optima, Gill Sans, and Acumin Pro Bold.
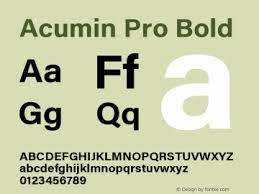
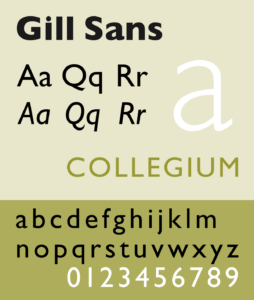

I chose these because all three were sans serif and easy to read, which fit Ms. Steven’s recommendations for what kinds of fonts work best in digital applications. After looking at all three charts, I found that Acumin Pro Bold was the most legible, as the high contrast and larger type make it easy to read even from a distance.
Next time I will take a brief break from the Practicing Immersive Design series to check out a webinar on Virtual Production hosted by AVIXA. Look forward to it!
Sources:
Stevens, Renee. Designing Immersive 3D Experiences. Pearson Education Inc., 2022.
Practicing Immersive Design-Part 8
01/25/24
![]()
Chapter 9 focuses on how AR and MR applications need to account for changes in light around the user. Since they can be used in a variety of indoor and outdoor settings, the program needs a way to avoid digital images becoming too bright or dark to use due to the ambient light. Some applications account for this by having light sensors that can brighten or darken the screen based on the lighting conditions where it’s being used. Other programming like Anchors change where AR elements are placed based on the orientation of the device or the nearby horizon line.
Another important element to adjusting AR and MR for different circumstances is the Figure-Ground relationship: a design element that uses colors and shapes to show which parts of a design are “background” or less important or “foreground” or most important. The difference between a design’s figure and ground can be clear (stable) or unclear (unstable.) A black dot in a white box clearly shows the dot is most important, while optical illusions, like Rubin’s Vase, allow the figure element to change based on the viewers’ angle or perception.

This chapter’s exercise involves modeling a 3D icon with Stable, Ambiguous, and Reversible Figure-Ground relationships, or color patterns that make it either clear or unclear which part of the design to focus on. I used Shapr3D to create my digital icon, which involved a fairly steep learning curve, as it’s my first time touching CAD software. After lots of trial and error with different designs, I settled on a divide symbol, and used the visualization settings to add different colors and textures to it. My “stable” version uses blue and yellow contrasting colors, while the “ambiguous” version has metallic black and white reflective surfaces. Since the image changes depending on its angle and the reflections of ambient light, the background can become the focal point of the model, or vice versa. My “reversible” model takes after Rubin’s Vase with its black and white colors, allowing the white divide sign to be either the focal point or a hole in the black background depending on the viewer’s perception.
Stable

Reversable

Ambiguous

Ambiguous

Ambiguous

Ambiguous

Ambiguous
The next chapter focuses on Typography, and involves making an AR eye chart. This will be my first attempt at using AR technology, but I’ll do my best!
Sources:
Ataturk.svg. “Rubin’s Vase.” Wikimedia Commons, 2011, https://en.wikipedia.org/wiki/Rubin_vase#/media/File:Face_or_vase_ata_01.svg
Stevens, Renee. Designing Immersive 3D Experiences. Pearson Education Inc., 2022.
Practicing Immersive Design-Part 7
01/08/24
Happy New Year! I hope everyone is having a great 2024 so far. Chapter 8 of “Designing Immersive 3D Experiences” focuses on incorporating “human factors;” knowledge of how people perceive, solve problems, and process information, into XR design. Graphic Design is a large part of this design process, as the Gestalt Principles, theories of how the human brain processes visual information, are essential tools in creating real and virtual objects that users can understand.

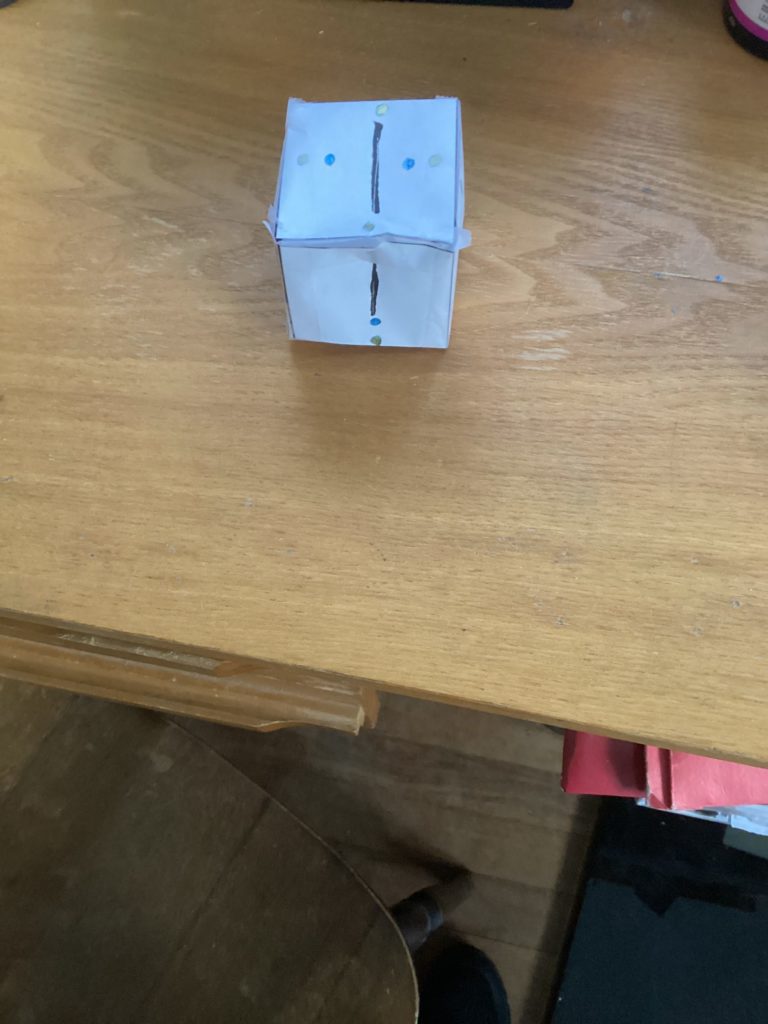
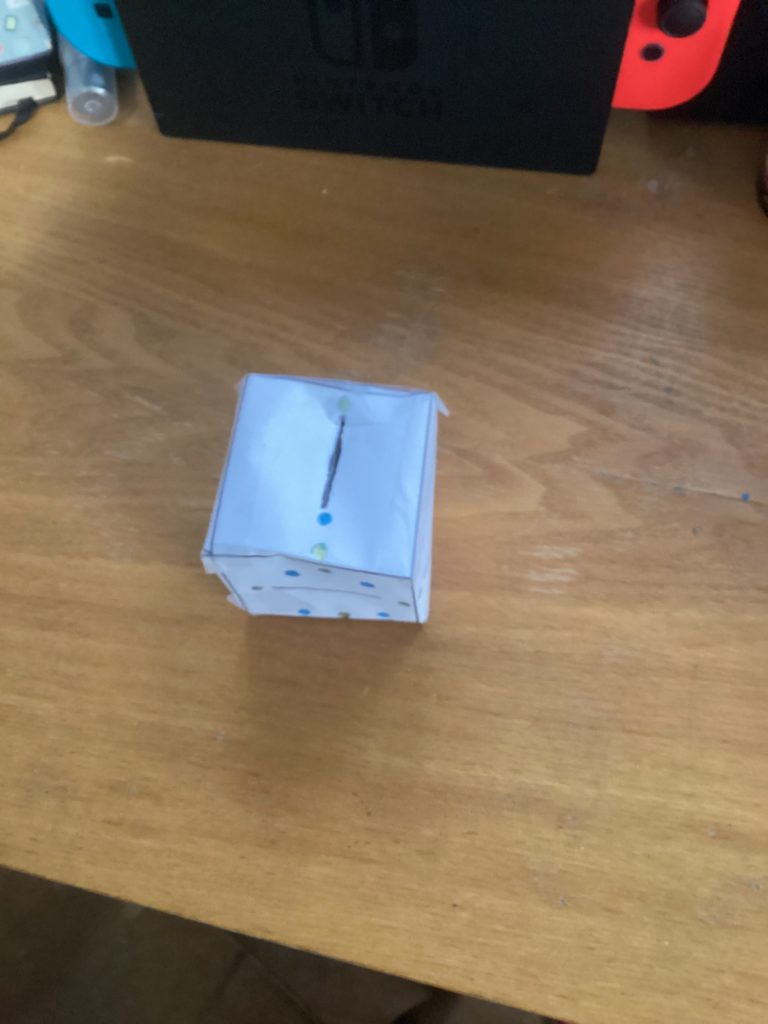
Today’s design exercise is to create a design of dashes and dots for a six sided cube using at least 3 Gestalt Principles. The goal is to have the design lead the user to examine all sides of the cube without giving them any explicit instructions to do so. My design uses contrasting colored dots and connecting dashes to lead the eye to other sides of the cube, and hint that every other face has part of the full design. While the blue dots are on the “inside” of the design, the green dots “point” to other green dots on other faces of the cube. I chose to complete my design on the folded cube rather than the flat version so I could make sure neighboring dots “pointed” in the right direction, and did not confuse the user. My cube uses the principles of Similarity, Proximity, and Continuation to make the final design visually appealing and easy to use. Next chapter I finally get to use the design principles I’ve learned to make my own 3D virtual design! Look forward to it!

“Gestalt Principles.” UX Hints, https://uxhints.com/visual-ui-design/gestalt-principles/, 2024.
Stevens, Renee. Designing Immersive 3D Experiences. Pearson Education Inc., 2022.
Practicing Immersive Design-Part 6
12/18/23
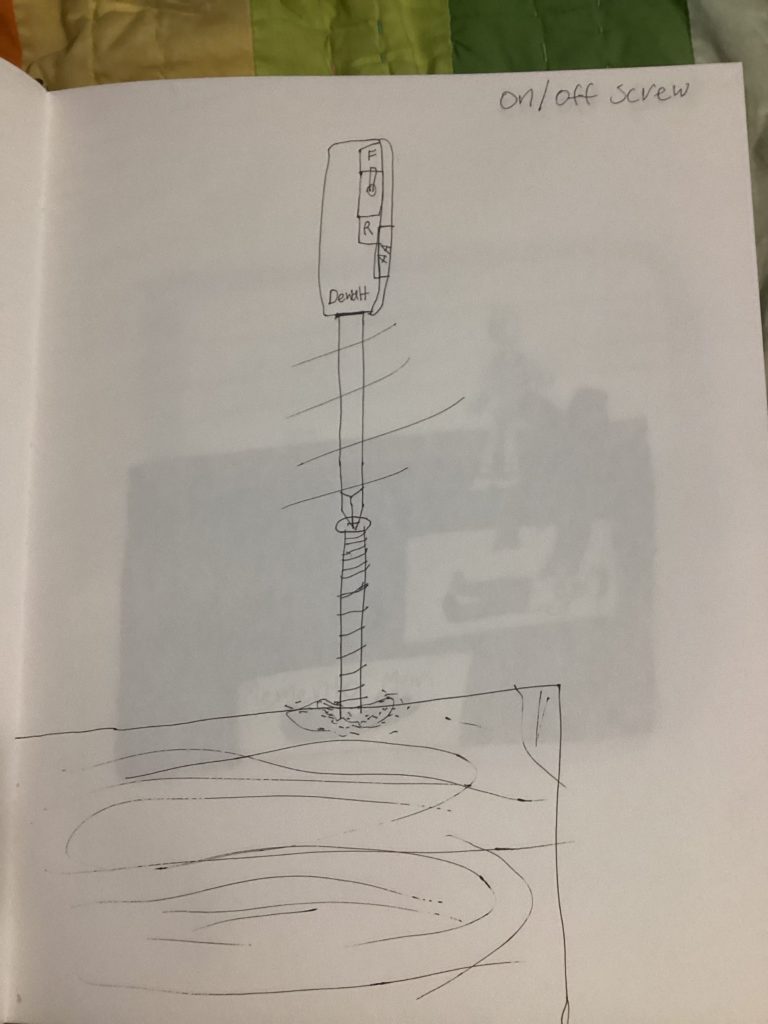
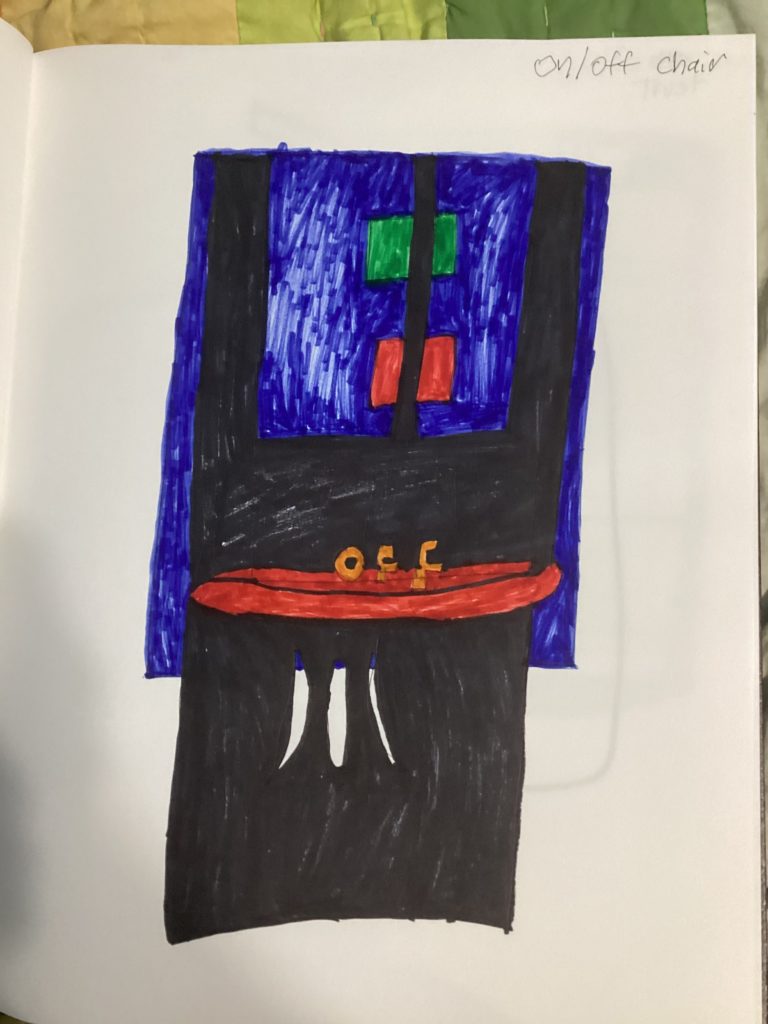
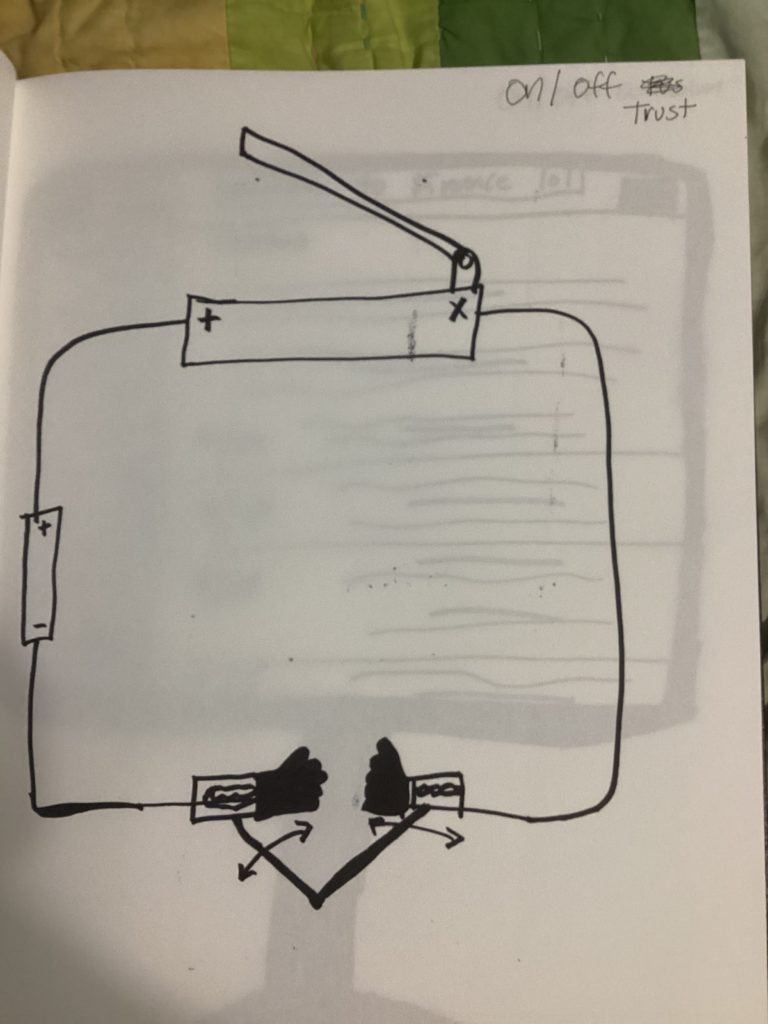
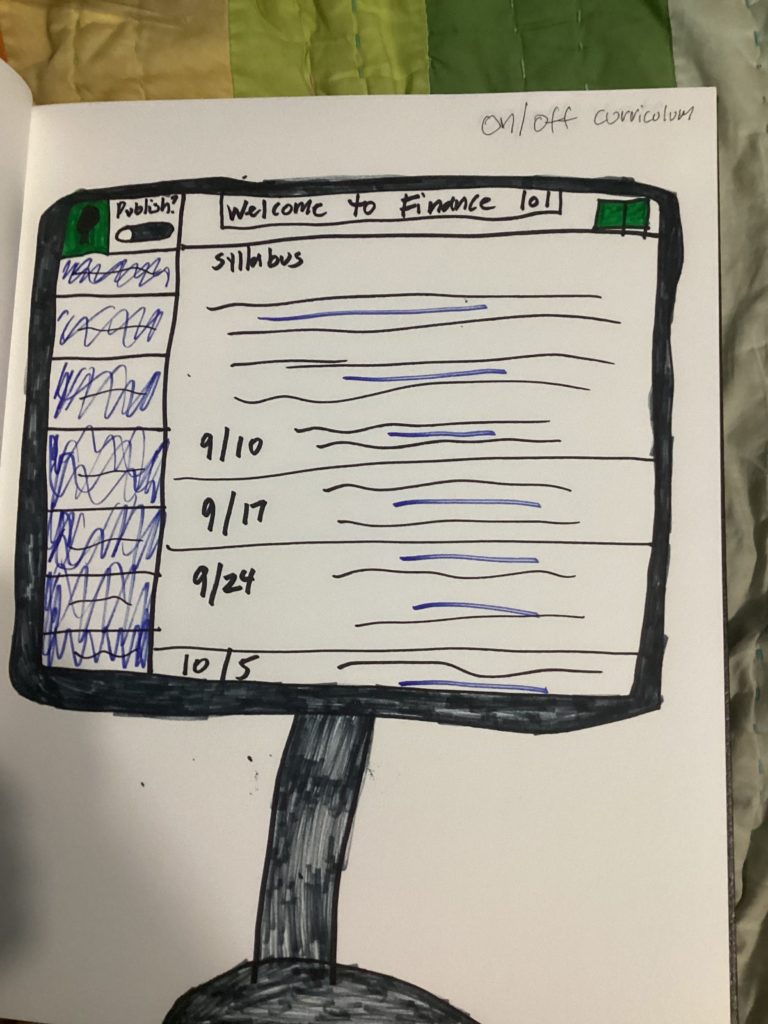
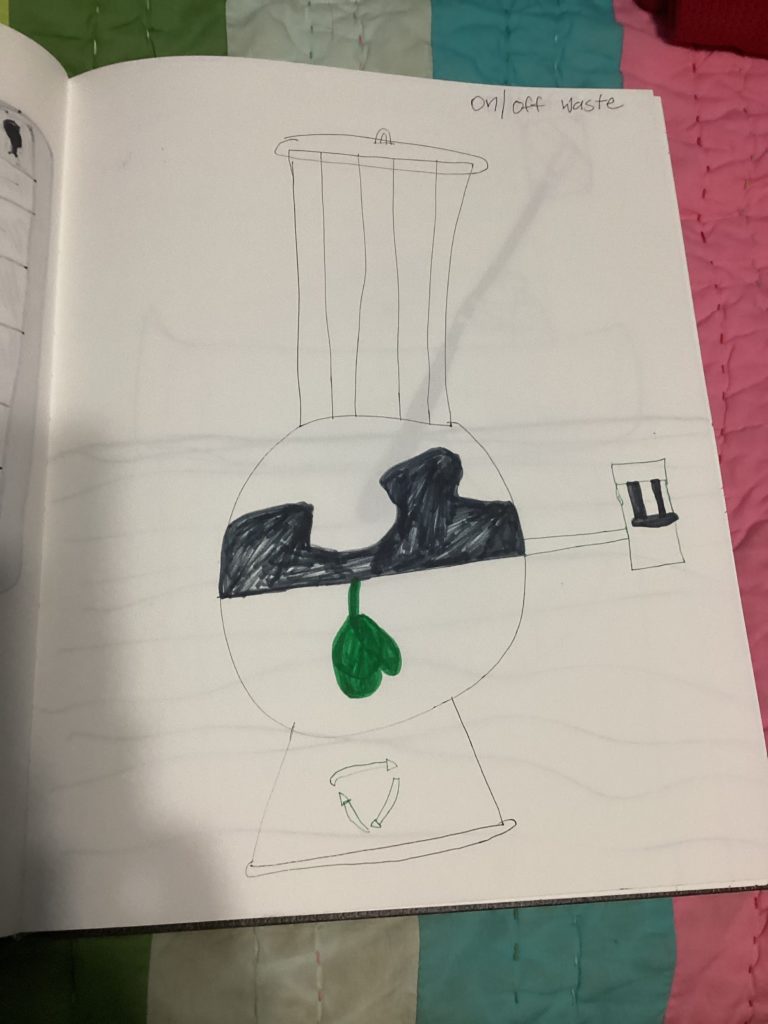
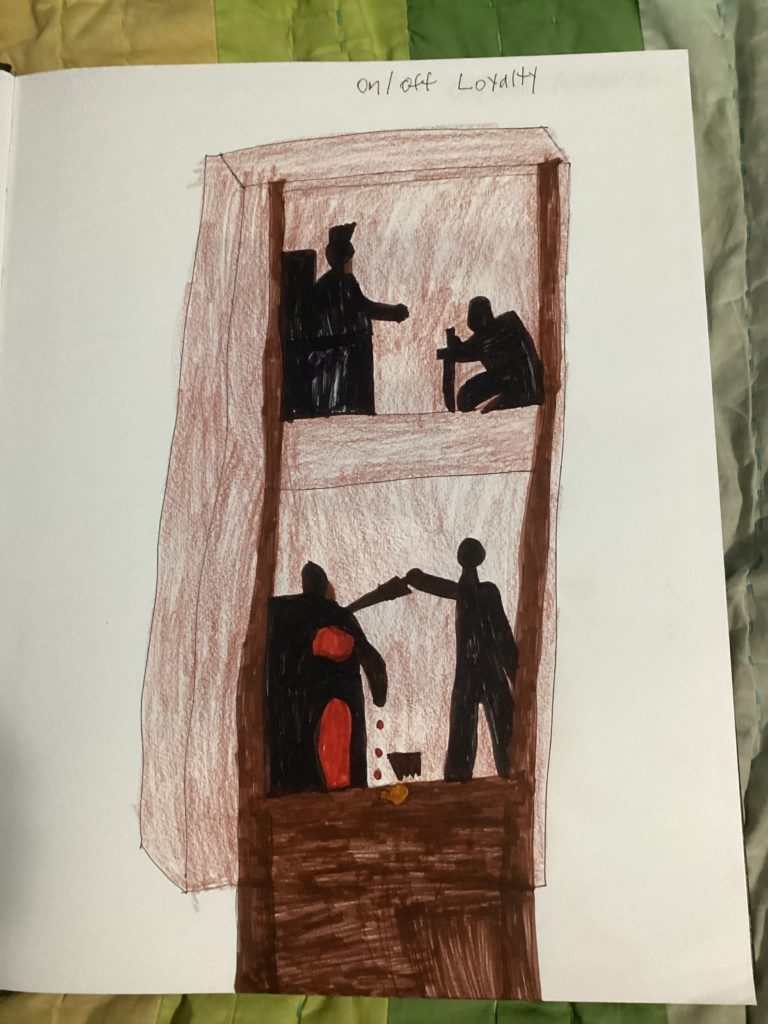
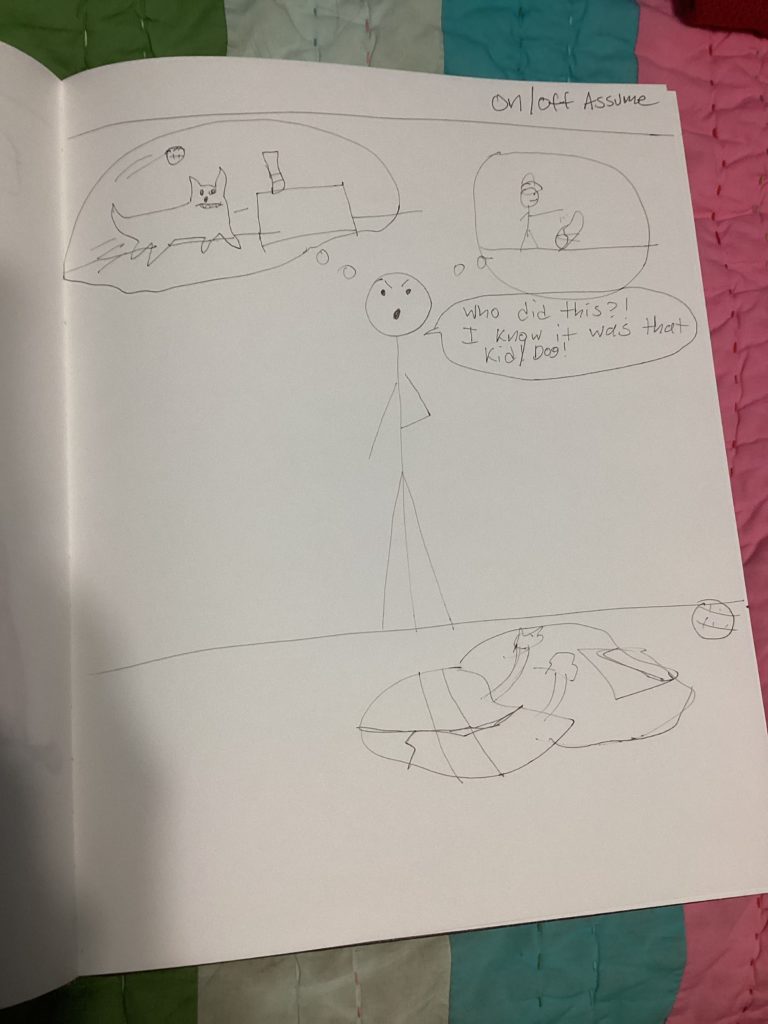
Chapter 7 of “Designing Immersive 3D Experiences” focuses on”The UI of XR,” and the importance of making XR interactions understandable and easy to use. Virtual objects can use “microinteractions,” like a buzz, turn arrow, or moving volume control, to show that the user has affected it, and have them move similar to their real-life counterparts. “Visual Metaphors,” like a magnifying glass for a search function, or an envelope for email, make it easy for viewers to know what apps do with just a glance. While not all XR programs can fully emulate reality, designers can use these metaphors and movements to clue the user in on how the virtual world works (Stevens 169-192.)
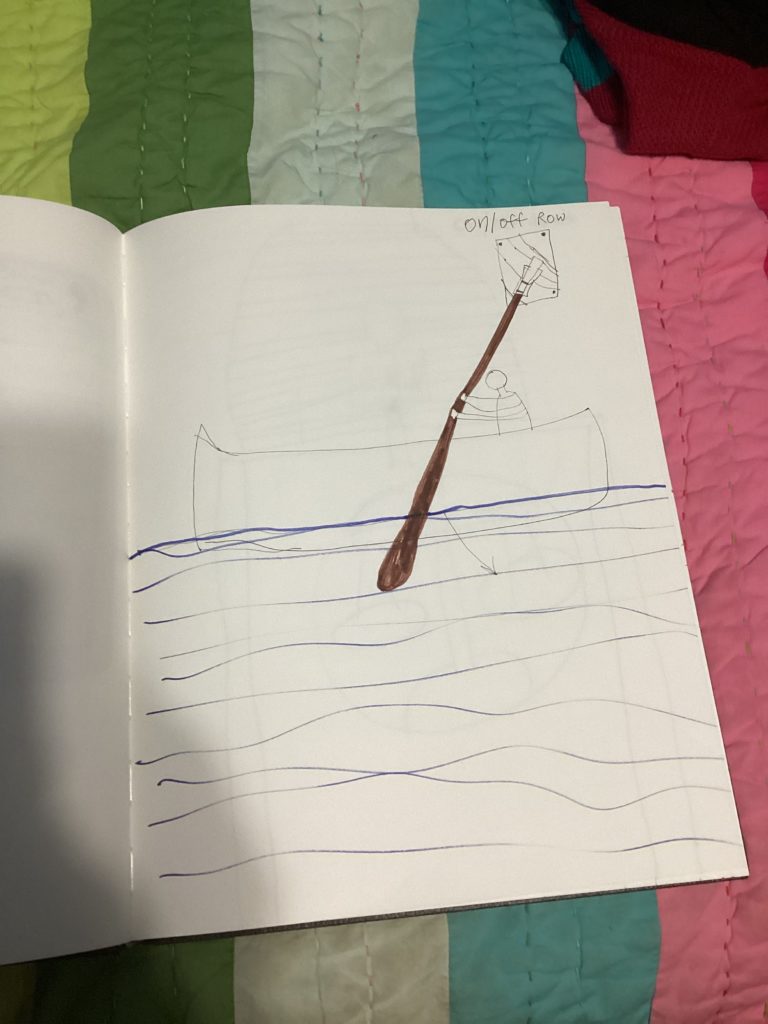
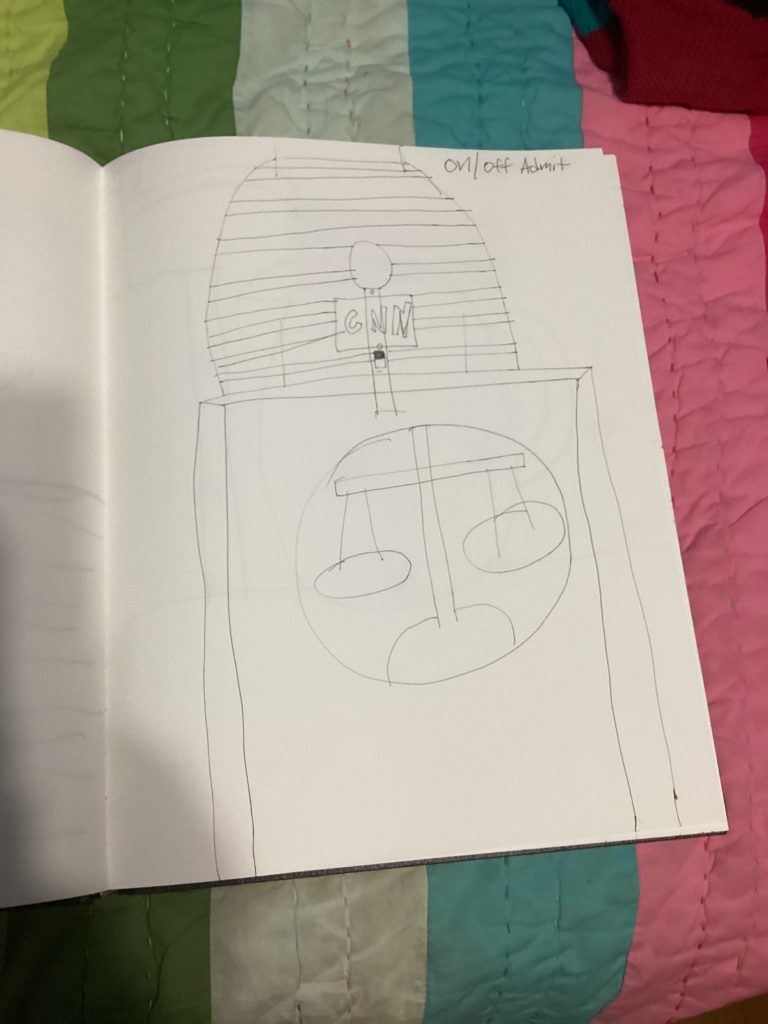
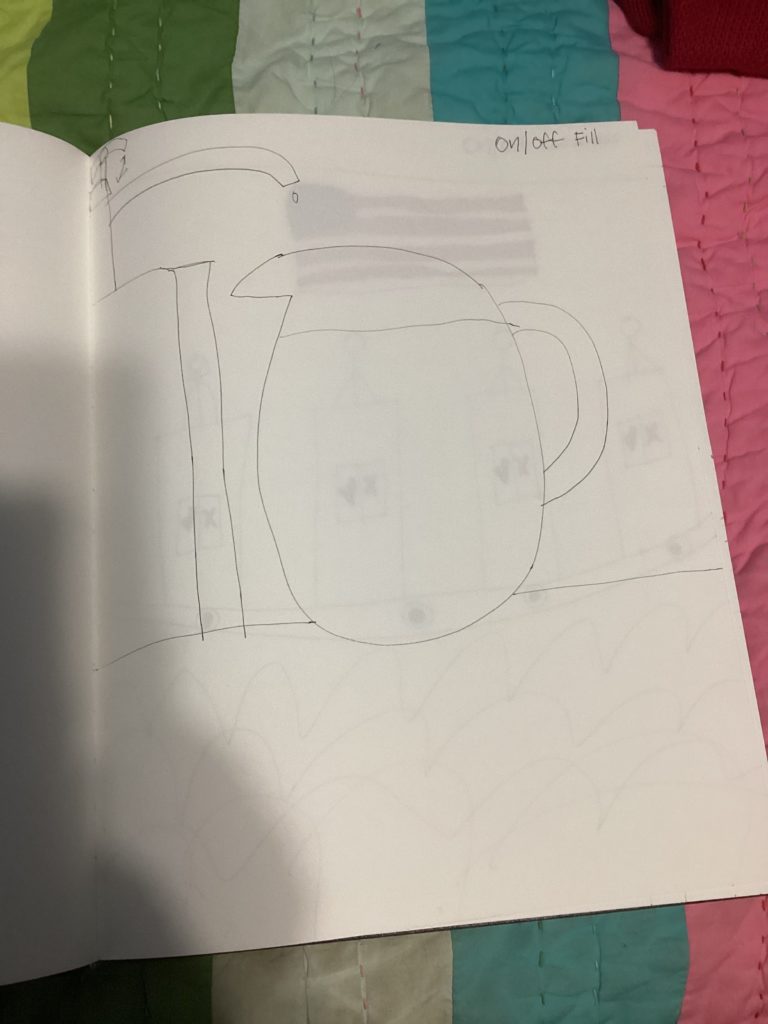
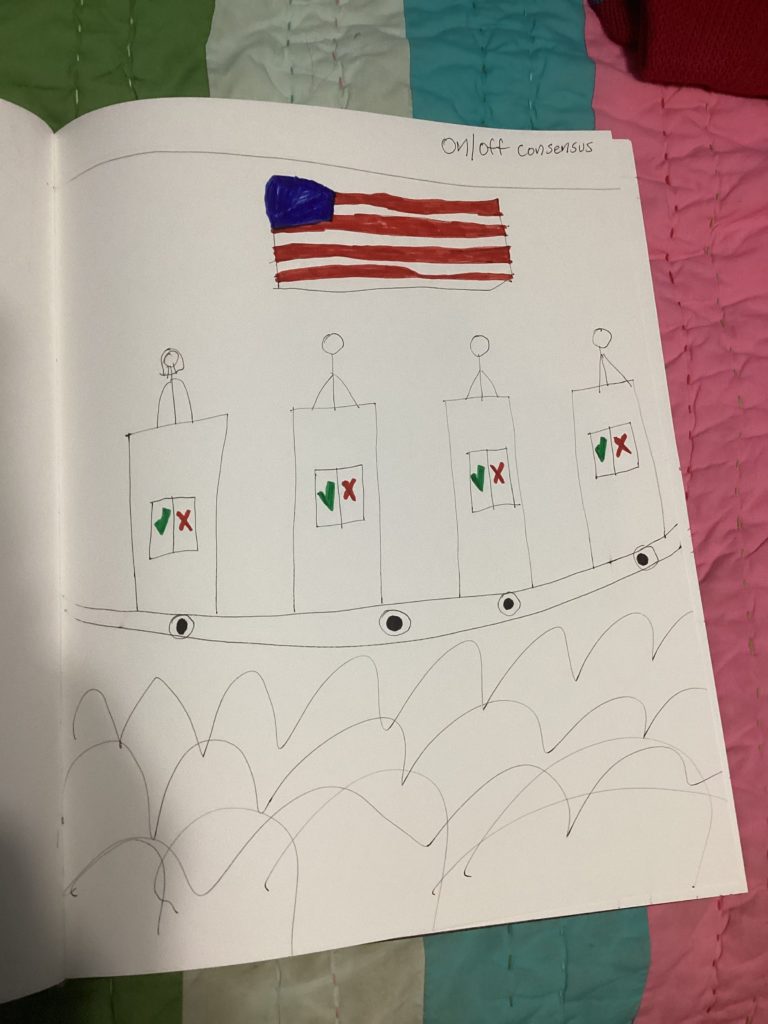
The exercise this time involves designing on/off switches for 20 different words, using visual metaphors to show what word you are trying to portray. I used randomwordgenerator.com to pick these 20 words at random:
- Loyalty
- Authorize
- Screw
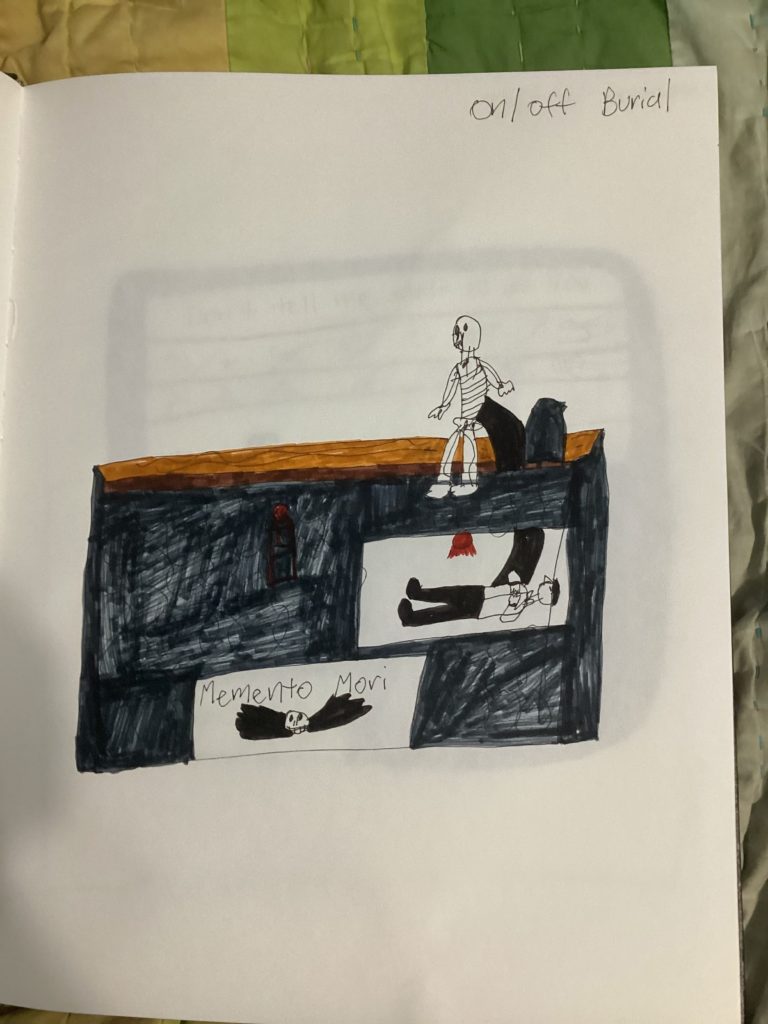
- Burial
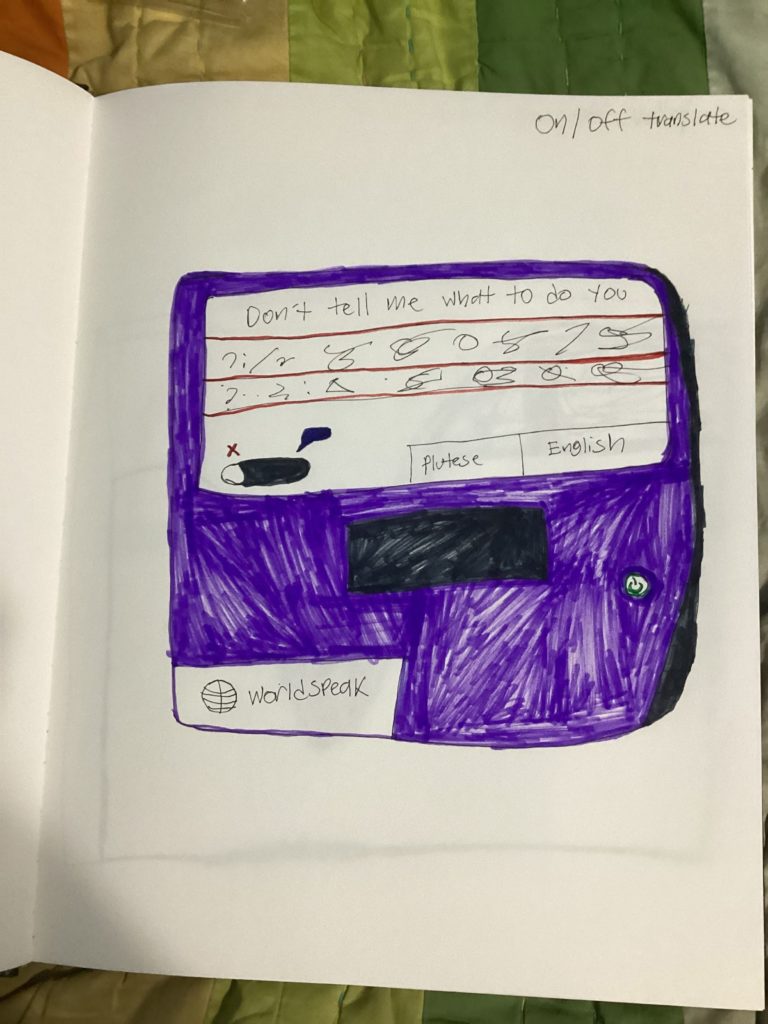
- Translate
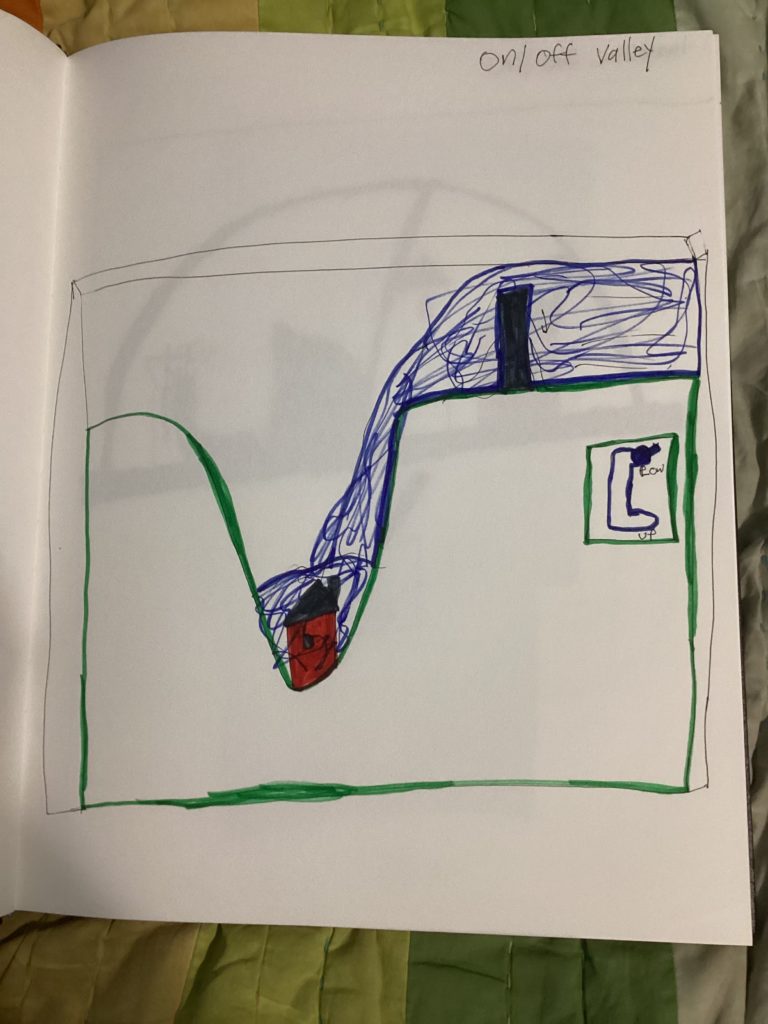
- Valley
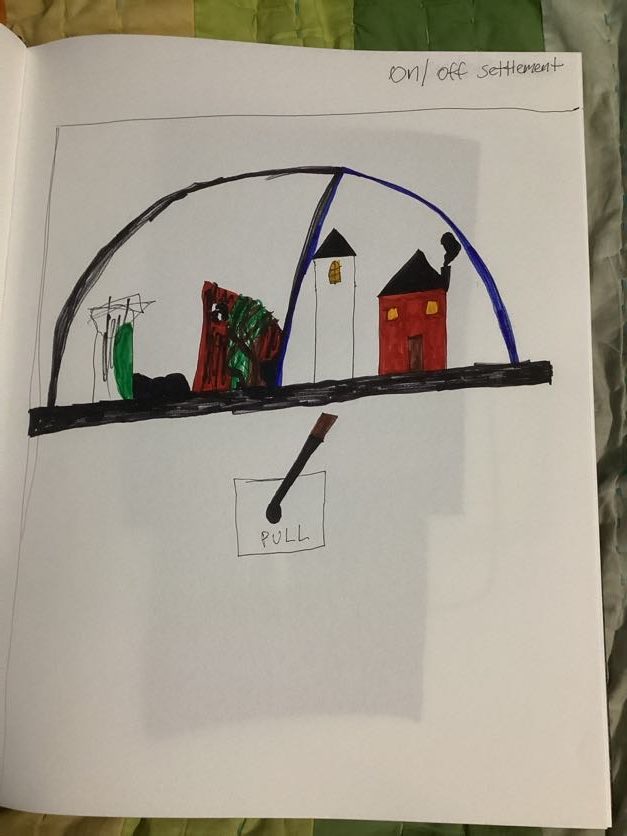
- Settlement
- Chair
- Trust
- Curriculum
- Waste
- Row
- Admit
- Fill
- Consensus
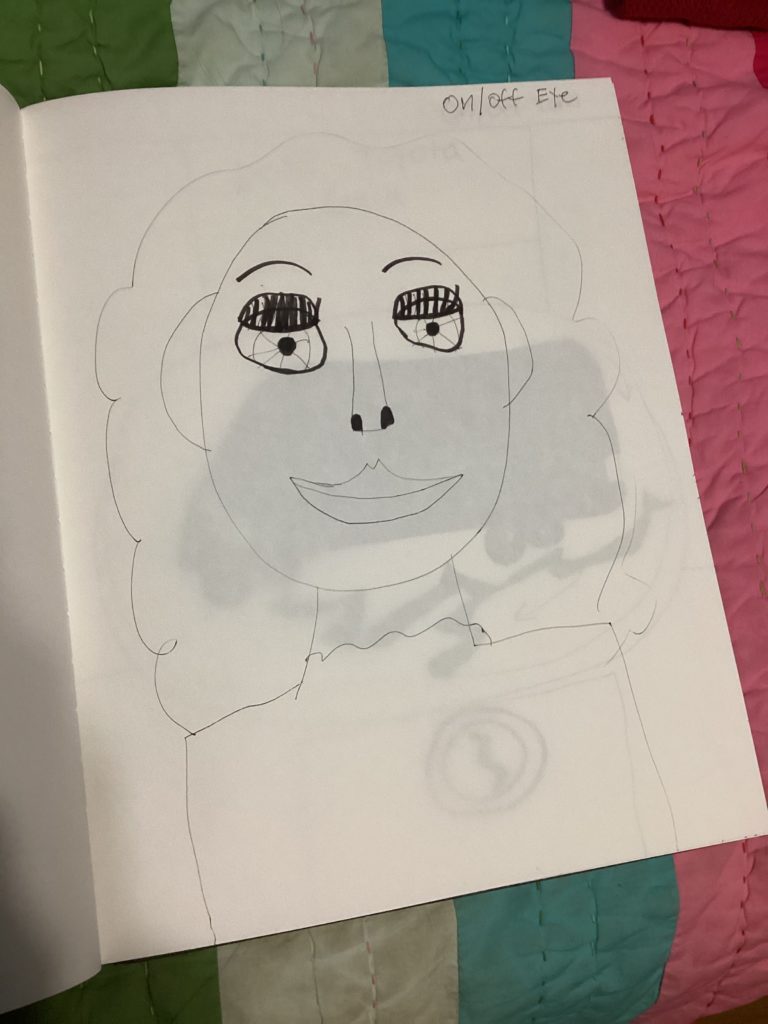
- Eye
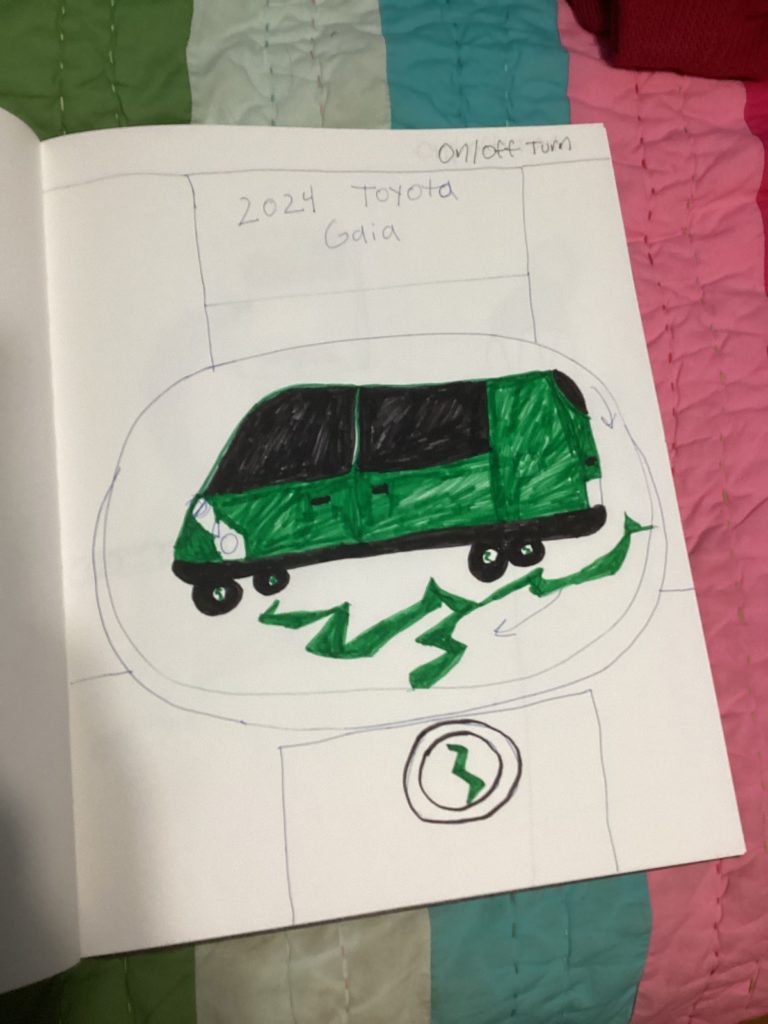
- Turn
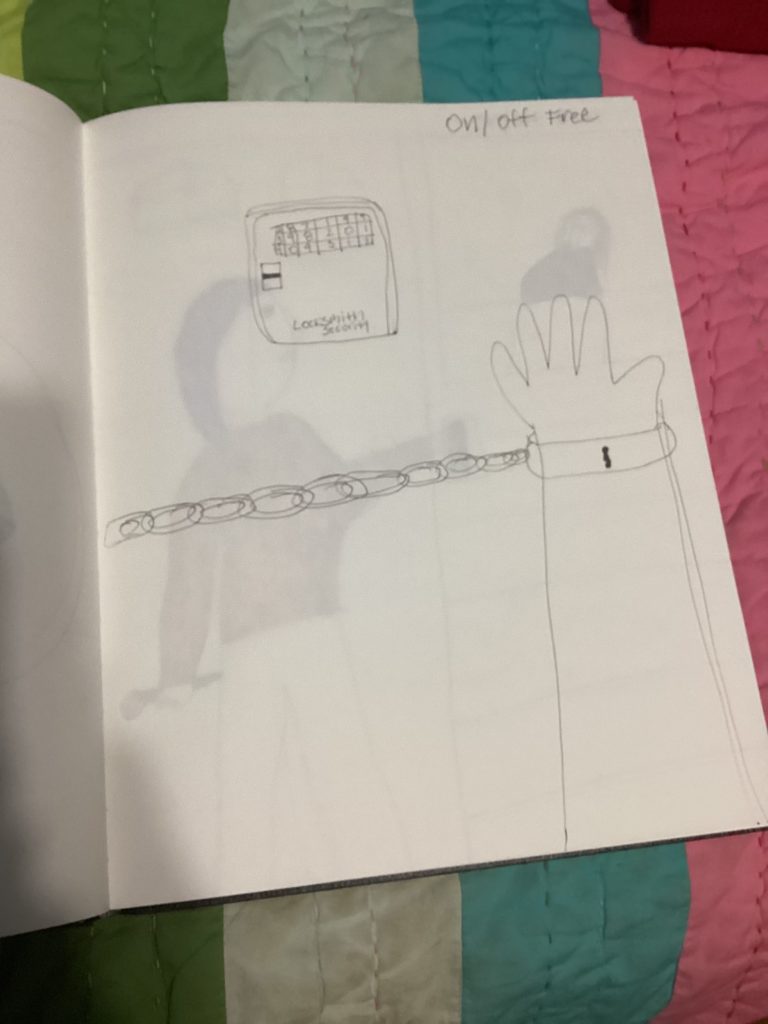
- Free
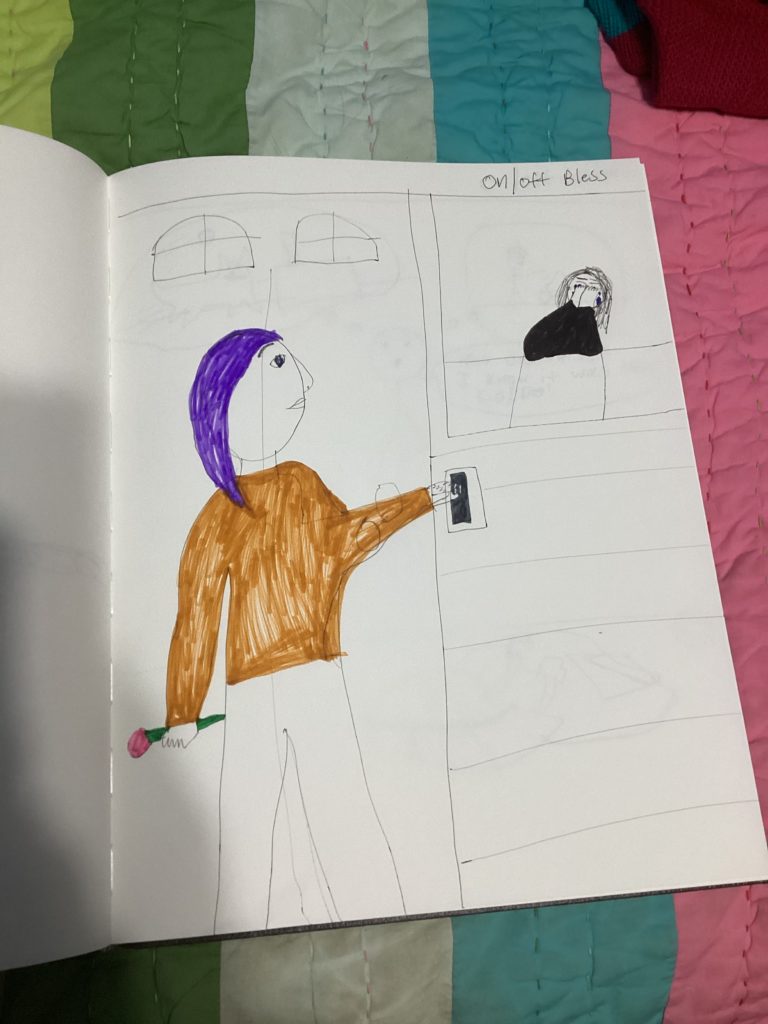
- Bless
- Assume
I made 20 designs for these words, which are presented in the gallery below. Some of these words were easier to depict than others, and I had trouble deciding which images would make the meaning clear. For example, “Bless” shows a person visiting a friend who has just lost a loved one. While “Bless” is often used in a religious context, I wanted to show that just providing support to someone going through a hard time “blesses” others with your compassion and care. As we enter the holidays and the end of 2023, I will strive to use my designs and multimedia skills to make the world a better place. Happy New Year all, and I’ll see you in 2024!

Stevens, Renee. Designing Immersive 3D Experiences. Pearson Education Inc., 2022 p. 169-192.
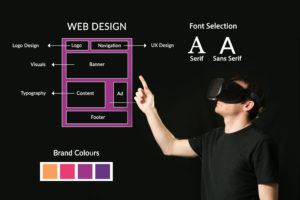
Digits.co.uk Images. “Virtual Learning-Web Design.” Flickr, https://www.flickr.com/photos/195219893@N08/51936543372/
Practicing Immersive Design-Part 5
10/15/23
The exercise for Chapter 6 involves one of my favorite activities: playing a new video game! The goal is to examine how the game’s tutorial and early stages work, and then see how accessible the game might be for players with disabilities. The game I chose to play was “Harvestella,” a combination farming simulator and combat RPG on the Nintendo Switch.
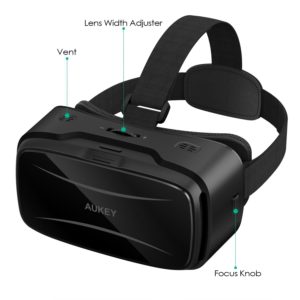
For the exercise I needed to start the game and note my initial impressions and any onboarding mechanics. Once I was comfortable with it, I needed to try playing with only one hand, with the sound off, and with my eyes closed to see how my experience changed. Most of the games I’ve played have adjustable audio and visual features built in, allowing players to change the brightness and quality of the images, raise or lower the sound, or add subtitles in different languages. A few years ago I had the chance to try a VR headset, which included a dial on the device to adjust the image focus. Even though I’m nearsighted, and had to remove my glasses to wear the headset, I was able to adjust the image to see clearly. I was impressed that the headset had included such a feature in the device, and I kept that experience in mind while testing Harvestella for accessibility.
Upon starting the game, I was impressed by the beautiful visuals, lovely music, and the intriguing story. Harvestella puts you in a fantasy world threatened by monsters, natural abnormalities, and alien invaders called “Others.” The goal is to figure out the world’s mysteries while farming, raising livestock, and getting to know the people in nearby villages. Initially, the hardest part of the game was learning the movement controls, as the camera and movement controls were different to other games I’d played in the past. By default, the left stick on the Switch controls the camera, and opens the menu and inventory, while the right stick controls actions, movement, and lets you select materials from the menu. The character creation screen that appears after starting a new game has limited options for skin, eye, and hair color, but it allows players to create a non-binary character in addition to a male or female one. I appreciated that this option was put in, as not all games have that feature.
Once I tried playing Harvestella one handed I realized the problem with the controls. Since the camera and menus are one one side and the actions and movement on the other, I would need to switch my hand position multiple times, making the game much more difficult. Since some actions (like finding and selecting menu items) require the use of both hands at once, they were impossible to do one-handed. The combat sections were even more difficult, as having to pause between moving the camera, my character, and hitting the attack button meant monsters killed me many times. And since the game only allows you to switch the confirm and cancel buttons from one joycon to the other on the setup screen, anyone with limited or no movement in one hand would find it hard to play.
Playing without sound was much easier than playing one handed. The game only has a few voiced lines, and relies on background music to set the mood, and sometimes alert you on danger lurking nearby. Most of the story is communicated through onscreen text, and even if monsters are nearby, they are easy to spot and confront in the specific areas that they show up in. Monsters also tend to approach you from the front, and don’t have sound effects like growling that you would need to hear in other games to warn you of an incoming sneak attack. Although the music and voice lines are a nice touch, they do not significantly detract from the gameplay experience.
The lack of voiced dialogue does have a downside, as It’s basically impossible to play the game with your eyes closed. Not only is it very hard to tell where you’re going, a blind player would completely miss the story, and what they needed to do to play the game. Key game mechanics require sight to read explanatory text, learn how to move and act, and locate where to go next on the map. It’s not an exaggeration to say that this game is basically unplayable for users with vision impairments.
I’m enjoying the game overall as it has a good story, and is well balanced between its farming and crafting side and its RPG like combat side. However, it needs a lot of improvement in order to be more accessible to people with disabilities. I believe allowing more actions to be moved to different buttons on the joycons, and putting in more voice lines, would be good first steps for Square Enix to take in order to improve Harvestella’s accessibility.
“AUKEY VR-03 VR Headset Virtual Reality 3D Glasses.” CableGeek. https://www.cablegeek.com.au/shop/entertainment/vr-headsets/aukey-vr-03-vr-headset-virtual-reality-3d-glasses/
Brown, Josh. “Harvestella Keybinds: How to swap the Confirm and Back Buttons.” Gfinity, November 4th, 2022. https://www.gfinityesports.com/harvestella/harvestella-keybinds/
Harvestella. Nintendo Switch, Square Enix, 2022.
“Harvestella-Launch Trailer-Nintendo Switch.” YouTube, uploaded by Nintendo of America, November 4th, 2022. https://www.youtube.com/watch?v=4QIWEAKcj6E
Stevens, Renee. Designing Immersive 3D Experiences. Pearson Education Inc., 2022.
Practicing Immersive Design-Part 4
09/08/2023
Chapter 5 of “Designing Immersive 3D Experiences” focuses on prototyping your XR designs in the real world before you commit to any one method. As I’ve learned in my college design classes, prototyping allows you to quickly try out many ideas in a simplified form without having to invest time and energy in fully developing them. Not only does this method let you spot errors and correct problems with your designs quickly, it’s much easier to fix design issues while prototyping than it is when the project is almost finished. AR and MR prototypes can be as simple as UI designs sketched on plastic transparencies, which allow you to conceptualize how the program will work with the real world environment.
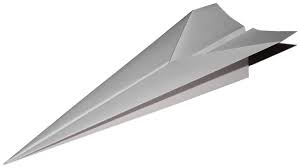
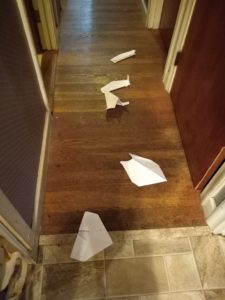
This chapter’s exercise involves folding and flying 10 different designs of paper airplanes in three stages, modifying the prototypes over time to try to make them fly further than before. Since the book requires that I don’t look up folding instructions beforehand, and because I hadn’t folded paper airplanes in a while, I came up with some interesting designs.
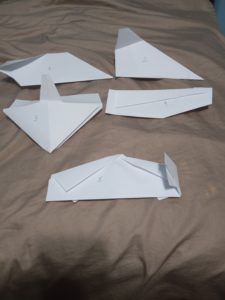
My first five planes were tested in a hallway, with plane 4 going the furthest overall. Examining it, I hypothesized this was because of its long, thin shape, and a long fold down the middle allowing air to pass through.
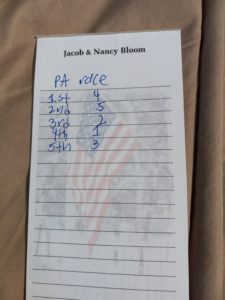

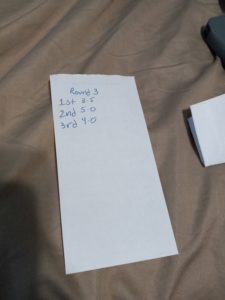
The second stage was to fold three more airplanes based on the design of plane 4, and test them and the previous winner to see which one was best. Surprisingly plane 3.5 won easily, with plane 4 only making 4th place. I guessed that plane 3.5’s triangular shape and extended flaps made it more “plane like,” and allowed it to fly further than plane 4.
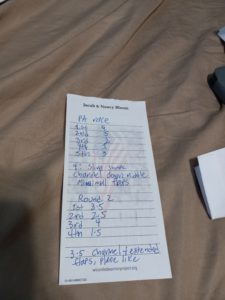
Finally, I needed to fold two more planes based on the new winner, and fly all three to determine the champion! Once again, plane 3.5 won handily, even though my two new planes (4.0 and 5.0) also had extended flaps and middle folds. The winning plane was much more compact than the other two, which reduced its drag and let it fly further than the other larger ones. Although I’m not an aeronautical engineer, this prototype process taught me a few tips on how to make a good paper airplane, while showing how rapid testing allows you to discover and correct product issues on the fly.

Next time I get to play video games for the chapter exercise! And I know just the game to practice with. Stay tuned!
Sources:
Stevens, Renee. Designing Immersive 3D Experiences. Pearson Education Inc., 2022. p. 107-133.
Practicing Immersive Design-Part 3
08/09/23
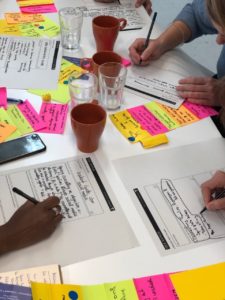
Today’s chapter of “Designing Immersive 3D Experiences” focuses on Ideation, and emphasizes that the start point of any MR design project is to identify what the product is, why you are creating it, and what problem it will solve for users. Any project simply made for its own sake, or made to use shiny new technology, will lack focus and fail to gain a user base. This reminds me of “Backward Design,” which I studied at an Online Class Design Course at Harvard Extension School. Developed by Grant Wiggins and Jay McTighe in their book “Understanding by Design,” Backward Design requires that teachers establish the learning goals of their course first, and then base all other elements of the class (lesson plans, learning activities, etc) around these goals. Establishing these goals makes for a more focused project, as the designer can focus on how best to teach the users/students, identify confusing parts of the content, and determine how to clarify those elements for better learning. For more information on Backwards Design, check out Mr. Wiggins explaining it in detail at Avenues: The World School YouTube channel.
After figuring out the “why” of a design project, Ms. Stevens suggests also determining the rest of the “Five W’s,” the Who, What, When, Where, and How of your project. Once those are established, the designer can brainstorm using divergent thinking. This involves coming up with multiple ideas for project concepts by thinking about random words in order to adjust thinking patterns and come up with ideas that the designer might not otherwise consider. Once a large pool of ideas is established, the designer narrows them down to just a few options using convergent thinking, combining ideas with commonalities and rejecting those that aren’t feasible. This chapter’s exercise follows a similar tactic, asking me to choose a random word and draw a “mind map” of association words linked to it. My word was “employee,” and I used it to create this mind map.
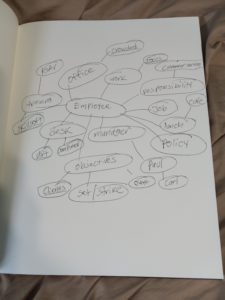
My map is based around my current work experience at Encore Global, and includes some of my daily tasks (set/strike, training), the names of my managers (Paul, Carl) and the main focuses of the job (customer service, focus, clients.) I had limited time to complete this map, but I feel that if I used divergent thinking to expand the number of ideas, I could come up with a potential project for how to make day to day work at Encore easier.
Sources:
Bowen, Ryan. “Understanding by Design.” Vanderbilt University Center for Teaching,, cft.vanderbilt.edu/guides-sub-pages/understanding-by-design/. Accessed 9th August, 2023.
Stevens, Renee. Designing Immersive 3D Experiences. Pearson Education Inc., 2022. pg. 83-106.
Wiggins, Grant. “Grant Wiggins-Understanding by Design (1 of 2).” YouTube, uploaded by Avenues The World School, 7th May, 2013. https://www.youtube.com/watch?v=4isSHf3SBuQ&t=92s
Wiggins, Grant. “Grant Wiggins-Understanding by Design (2 of 2).” YouTube, uploaded by Avenues The World School, 7th May, 2013. https://www.youtube.com/watch?v=vgNODvvsgxM
Practicing Immersive Design-Part 2
07/02/23
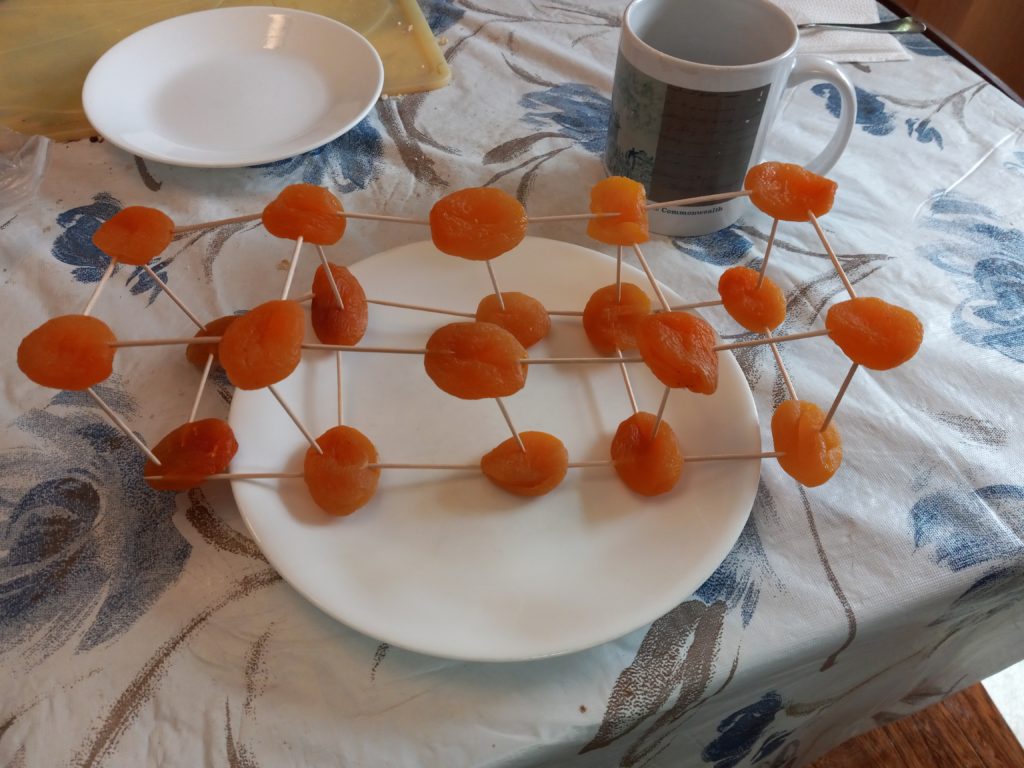
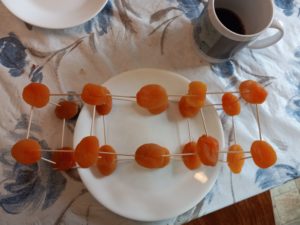
Chapter 3 of “Designing Immersive 3D Experiences” focuses on how to create 3D models and scenes, like assembling objects in a school diorama project. You can use basic “primitive” shapes like cubes or pyramids, or have a spline, a complicated curved or slanted line, generate a unique shape. You can then add materials, colors or textures, and textures, specific images to your shapes to decorate them. I’m already familiar with textures, as they remind me of basic animations I saw on computer screensavers as a kid. Since assembling a scene in Extended Reality (XR) is the focus of this chapter, the exercise this time focuses on building shapes.
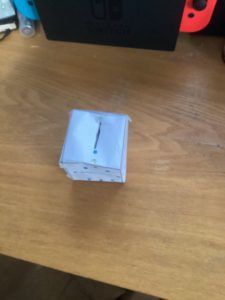
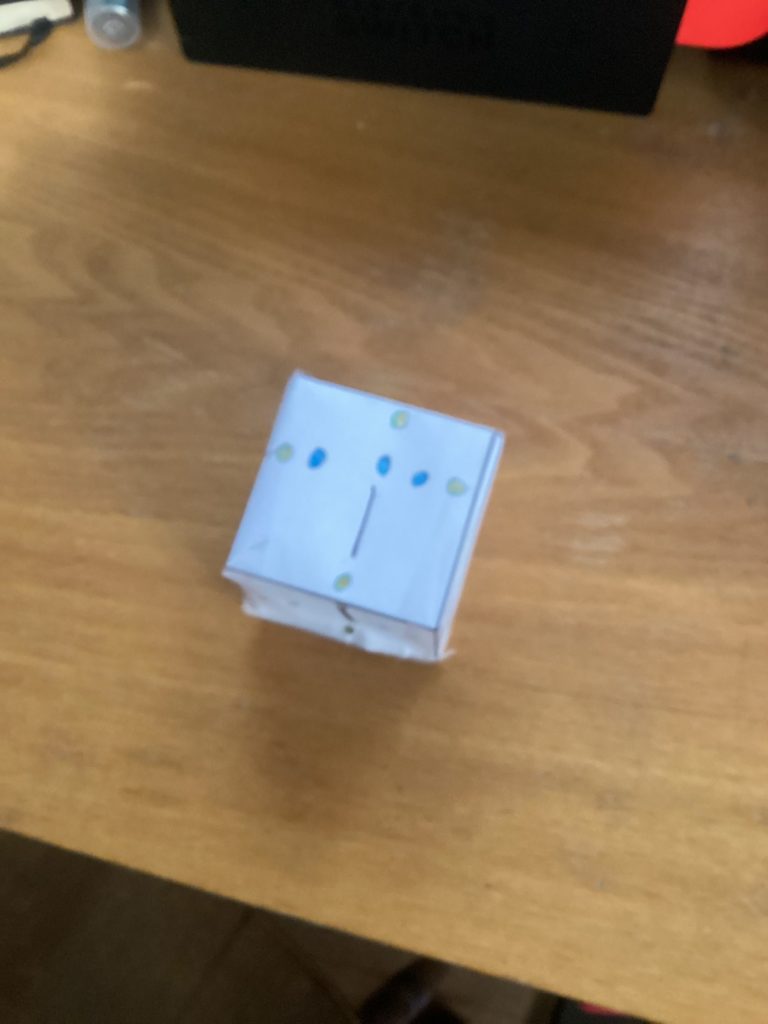
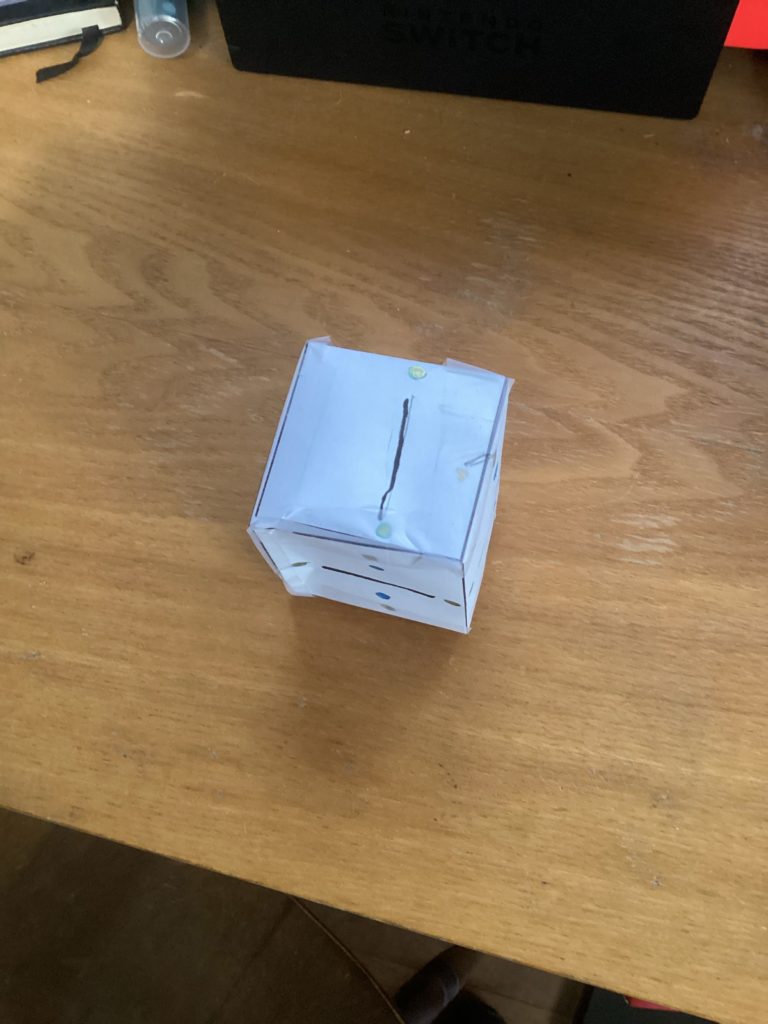
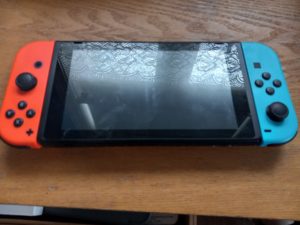
It requires me to “select a primitive shape-cube, prism, cone, or cylinder” and create it using toothpicks held together by marshmallows, or another sticky material. I used apricots for this exercise, as I was out of marshmallows at the time. The second part of the challenge involved recreating objects in my room using the same marshmallow-and-toothpick construction method. (82) I quickly realized that making models with curved or circular edges is difficult as toothpicks usually make straight lines. Since it’s more difficult to make splines in real life than digitally, I think that using pipe cleaners in this exercise will make it easier to construct more complex models. As shown with the replica of my Nintendo Switch below, the curved parts of its joycons with difficult to recreate.
At this point I wondered if all the exercises would be experiential, and when I would get to use actual software to practice my modeling skills. In the later chapters of this book, the activities involve using Adobe Dimension to start creating prototype 3D models and more. I haven’t used this software before, but I’m looking forward to getting my feet wet as I complete this book.
Sources:
Stevens, Renee. Designing Immersive 3D Experiences. Pearson Education Inc., 2022. p. 82.
Practicing Immersive Design-Part 1
05/21/23
While browsing my local library, I found a book titled “Designing Immersive 3D Experiences” by Renée Stevens gracing the New Books section. I immediately checked it out, as VR, Projection Mapping, and similar technologies have always fascinated me, both for their beauty and immersive qualities. The book contains a series of hands-on exercises designed to teach readers the principles of immersive design, while providing information on key concepts and knowledge involved in the field. My next few blog posts will show how I perform these exercises, and any other insights or ideas I develop while reading this book.
The first exercise, after chapter 2, involves looking around the room you are in (in this case, my bedroom) and seeing how AR could improve it:
- Consider the use of that room and what actions typically happen there.
Consider how you use it, but also how others would use the room.
What ways could AR be added to that space to improve it?
What actions could be enhanced through the addition of a layer of information within the same space? - First, come up with ten different ideas for just the room you are in. Then take three of these that you are most excited about, and sketch out a rough drawing of what the AR experience would look like in its simplest form-for example, an augmented clock on the wall or a weather app next to your front door giving you real-time data about what it’s like outside. (Stevens 50)
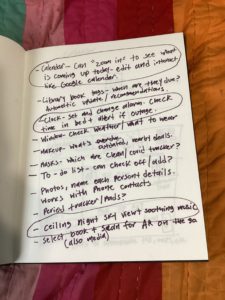
The list of eleven ideas I came up with included some basic things, like a clock, and a zoomable calendar that I could view and edit with minimal gestures. It also included some “fun to have” things, like the star ceiling and soothing music to relax to at night. Although I didn’t choose it for the final three ideas, I really like the idea of scanning a book on my shelf with just a glance, and then reading it later on a handheld device like a Kindle, or using a Head Mounted Display like Google Glasses. I chose an AR clock because I’d like to check the time without getting out of bed in the morning, and also avoid the doubt of “wait, did I set the alarm?” right after getting in bed. The calendar accomplishes the same basic functions of seeing what events are coming up on the go, and the star ceiling is both for fun and relaxation purposes.
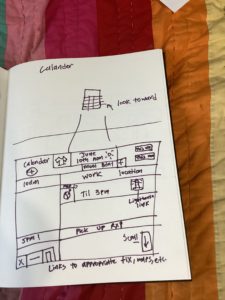
In addition to appointments and alerts, my AR calendar has a weather function (with clothing suggestions), links relevant files (like train tickets or my work schedule) attached to corresponding events, and a map link to help me with directions if needed. It also can attach to Facebook or other social media pages to alert me to notifications such as friends birthdays, and is available in week, month, and year views. Google Calendar does have several of these features currently, but I think having everything on one page in AR would help people better manage their schedules.
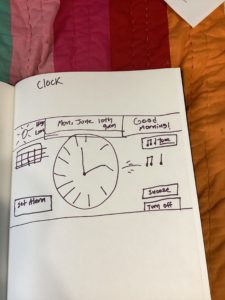
My AR clock has an alarm function (with selectable tone or music built in), as well as the same weather function as the calendar. It also links to my AR calendar, and allows users to easily set, snooze, and turn off alarms. It also displays appropriate greetings like “Good Morning” or “Good Night,” but can also show date specific greetings like “Happy Birthday” or “Happy Thanksgiving.” Since most people tend to loathe their alarm clocks, my goal is make this AR clock as approachable and easy to use as possible.
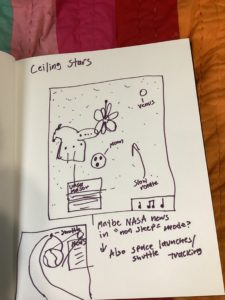
My AR Star Sky comes in two modes: Day Mode and Sleep Mode. While the evening function shows season appropriate stars with soothing music, the Day Mode is used for learning about stars and space more in-depth. You can see what the night sky looks like in different places and times of year, see illustrations and stories explaining constellation names, and even track upcoming shuttle launches from government and private space agencies. For example, you could watch future mission launches live and track the spaceship’s course, or view information on historic missions like the Apollo program, complete with archival footage and audio. Planets and stars would also be searchable, and events like solar eclipses and meteor showers could be searched and bookmarked for daily reminders. This feature could be used for individual study, or in a science classroom for K-12 students with grad appropriate content.
I am enjoying this workbook so far, and plan to complete each exercise to build my skills in immersive design. Are there any similar resources that you would recommend for learning skills in immersive design and multimedia? If so, feel free to post them in the comments below. In the meantime, I need to go buy some mini marshmallows for the next chapter!
Sources:
Stevens, Renée. Designing Immersive 3D Experiences. Pearson Education Inc., 2022. p. 50.
Lessons From The State House Tours Desk

09/22/2022
Next week I will start an exciting new job as an Audio Visual Technician at Encore Global. I am thrilled to have this opportunity to advance my multimedia skills while helping my new team produce amazing events for our clients. However, every new beginning requires an ending, as I am leaving my position as a State House Tour Guide that I held for the past nine years. I will miss my fellow tour guides, but I will take with me lessons in customer service and public speaking to my new position and beyond.
The most important of these lessons is to be flexible in changing situations. Since the Massachusetts State House is a public building, you can never predict who will come in for a tour on any given day. Scheduled tours could be much larger or smaller than predicted, legislators could schedule day-of tours for their constituents, and rooms like the House and Senate chambers could be closed for events to name a few examples. I’d also sometimes have to make quick adjustments during my tours, such as stopping early so my group could meet with their legislators, avoiding rooms that were occupied for events, and using the elevator and wheelchair lift to accommodate visitors with strollers or mobility issues. I quickly learned that our daily schedule was not set in stone, as tours could be canceled, adjusted, or added at any time. The COVID-19 pandemic made this even more clear, as I needed to work from home for the initial months of the State House’s closure and switch to creating digital educational content for the State House website.
Another lesson I learned was to calmly handle rude and difficult patrons. We would sometimes get visitors who had come to complain to their legislators about an issue, visitors with mental health issues, and irate callers who were trying to reach other State House officials. Although I hated getting yelled at, I handled difficult visitors and callers as calmly and professionally as I could. If I had difficulties with them, or felt unsafe, I would discuss the issue with my Manager, and we would determine if the case needed to be escalated to the Rangers office. I also was patient and empathetic with visitors and callers who needed to access essential services like unemployment benefits and were frustrated that I couldn’t help them. For those cases I made sure I gave the visitor or caller accurate contact information to the department they needed to reach, and made clear that my job was to help them find accurate information to resolve their issue.
Finally, I learned about the importance of careful listening in the workplace. Although I soon picked up on common questions, such as “where’s the bathroom?” and “why is Massachusetts called a Commonwealth?” I sometimes got vague questions from visitors who had heard an offhand story about state history or the State House building, or based their inquiry off of inaccurate assumptions about how state government works. I needed to carefully listen to these questions and ask the visitor more questions if I was confused in order to interpret what they were asking about and give a good answer. I also found that solid communication was essential for giving visitors clear instructions about tour policies, logistics, and directions around the building and to nearby tourist sites in Boston.
I know that these skills will serve me well at my new position with Encore Global, as effective communication, handling frustrated clients, and adjusting to changing plans are needed to organize and pull off successful events. I look forward to seeing where this new opportunity will take me in my future career.
FutureLearn-A Review
07/11/22
While perusing job listings on museumsavy.com, I was introduced to a website called FutureLearn, which offered degrees, microcredentials, and individual courses in fields ranging from computer science to literature. Intrigued, I signed up for a yearly subscription, hoping I could learn extra skills that would help market me better in my job search.

I am currently taking courses in Object Based Python Programming, Interview Skills, and Creating Digital Video for Online Courses. Each course takes the form of various asynchronous videos, articles, and activities that take between two and three weeks to complete, with links to outside resources that can provide additional information. The courses are easy to navigate, with sequential links leading to the next segment of a course, and information provided in easy to understand videos and paragraphs. The videos were also closed captioned, which is good for accessibility and helped me complete lessons during slow times at work without disturbing others. The biggest weakness of the courses was a lack of feedback from teachers and interactions with students. There are chat boxes at the bottom of each lesson page, but they only provide limited interactivity with other students, and there is no clear way to ask for help from the instructors if you run into a problem. I would recommend that FutureLearn add an option to contact the instructors to ask questions or raise concerns with the class, as well as a video chat feature where students can meet each other and the instructor or TA to debrief on the week’s classes and how everyone’s experiences have been so far. Overall, I think FutureLearn is a solid platform for building career skills, but it can be improved to enhance learning by building community and becoming more user friendly.
Takeaways from AAM 2022
06/22/2022
I attended the conference for the first time this year as it was in my hometown of Boston, and I was eager (desperate?) to gain contacts in the museum industry. At the time I was coming to the end of a temporary position at the Museum of Science, Boston as an Online Programs Tech Assistant. I enjoyed the job, as it incorporated my three passions of digital media, video production, and museum education into one, but only for a 6 month period. As openings for similar positions that were not exclusively in digital marketing were rare, I figured some networking at a professional conference couldn’t hurt.

I had to work on Thursday, but I joined a group from the Association of Academic Museums and Galleries for an art gallery walk at the SoWa Design District and dinner that evening. It was my first time at the District, and I enjoyed viewing the unique art and socializing over drinks with the group. Plus, I got to vent about annoying visitors at work with professionals who knew what I was going through, and were happy to share their own stories.
I arrived early to the BCEC on Friday for my first day of the conference, and after getting my badge, I went straight to the First Time Attendees Breakfast. We were served eggs, bacon, and coffee while a local organizer dressed as the Mad Hatter from Alice in Wonderland gave advice on how to make the most out of our experiences. He also tried to connect attending the Annual Meeting to Alice falling into Wonderland in a strained metaphor, which did not seem to land well in the packed full conference room. For my first impression of the con, it came across as odd and didn’t inspire much confidence.
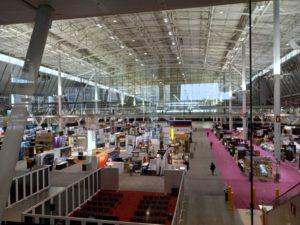
The rest of the day was taken up by workshops, keynotes, and exploring the well-stocked dealers hall. I got to meet a lot of staff from companies working with digital media, while practicing my elevator pitch and enjoying free coffee from the Electrosonic booth. I also ran out of business cards within two hours. (Mental Note: bring extra cards tomorrow.) After a brief dinner at the evening social hour (featuring large platters of comfort food) I left early to get enough sleep for the next day.
Saturday started with me meeting Genevieve Cleary and her colleague from The Hum for coffee at the Omni Hotel. Ms. Cleary had sent me an email asking to meet and discuss her immersive sound exhibit that had just debuted at SXSW the previous week. Although I was initially skeptical, I was drawn in by her plans for the exhibit, and we discussed how it could be used in an exhibit about the science of sound in the future. I had to clarify that I was not in a position to make exhibition and programming decisions for the Museum of Science, and I was unsure if I was the right person to pass the information along. I had to repeat this point many times over the course of the conference, as most vendors would launch their sales spiel as soon as I approached their booths, when all I wanted was to express my interest in possibly working for their company. I still have emails in my inbox from company reps asking me to set up sales meetings for the Museum, which is flattering and embarrassing at the same time. That evening we were bussed to the Museum of Science for an evening party, featuring a DJ, drinks, and a limited selection of cafeteria food. After talking to some attendees, I found that the AAM Meeting parties used to be fancier, but the pandemic and related budget issues at the Museum had limited the offerings available.
Sunday was the last day of the conference, and I attended an interesting presentation about promoting diversity and including the voices of POC in museums and cultural centers. However, a post on the Instagram page “Change The Museum” that I saw after the conference informed me that almost all of the diversity focused panels were presented on the last day, with some directly conflicting with each other. While the conference was organized around the keynotes so that the same themes were presented in specific time blocks, it does not look good for AAM to save the inclusion and diversity slots for last. I believe that confronting racism and bigotry in museums while promoting inclusion is one of the biggest issues museums are confronting today, and so they should be front and center instead of an afterthought. The dealer’s hall closed earlier than I expected that day, and I had to rush back to buy a candle I wanted from 54 Degrees Celsius in the Museum Gift Store side of the hall. The Museum Store Association was holding their conference in the BCEC at the same time as the AAM Meeting, and I got to see a large variety of merchandise on display, from candy to decorative ponchos. By midday the conference was over, and I left with many flyers, business cards, and pieces of candy offered by the vendors.
Overall, the 2022 AAM Annual Meeting was fun and informative, but did not offer all the opportunities I was looking for. There was little in the way of information on furthering my career in museum technology, and the busy schedule and large social events made it hard for me to talk to people one on one for more than a few minutes. On the plus side, I got to meet a lot of people in the field, and hopefully, one or more of those contacts will help me out in my future career.
“The AAM Annual Meeting was my first time attending a professional museum conference, and it was a positive experience for me that allowed me to make connections I wouldn’t have otherwise.”
Hello my loved one I want to say that this post is amazing great written and include almost all significant infos I would like to look extra posts like this.
It’s as if you’ve tapped into my thoughts! You clearly have a deep understanding of this topic, almost as if you’ve authored a book on it. I believe adding a few images could enhance the message, but aside from that, this blog is excellent. It was a pleasure to read, and I will definitely return.
Hi, I’m Jack. Your blog is a treasure trove of valuable insights, and I’ve made it a point to visit daily. Kudos on creating such an amazing resource!
Its like you read my mind You appear to know so much about this like you wrote the book in it or something I think that you can do with a few pics to drive the message home a little bit but other than that this is fantastic blog A great read Ill certainly be back